Brush up your Dutch. Haven´t found an english version out there….
Kategorie: Digital (Seite 1 von 2)
Install Linux Distribution: Debian 12
Download the latest installation image of debian 12 alias Bookworm from: look for the file with the .iso extension:
https://cdimage.debian.org/debian-cd/current/amd64/iso-cd/
Now use your favorite imagewriting tool to write this diskimage to a USB stick. (Note this USB stick will be completely wiped during this process)
Boot with this USB stick on your target machine and do a text based install. (Second menu option)
When asked choose LVM with seperate home partition. When you know what you are doing do whatever you like). Assign 256GB to the auto partitioning. (Gives us flexibility later)
In the installation process create a user called roon.
When selecting the install options only choose „ssh server“ and „standard system utilities“ so we get a bare minimum system.
now login as roon and install some fundamentals:
This will
- update your sytem to allow installing the lastest tools
- upgrade our base install
- Install sudo so we can execute privileged commands as our newly created roon user
- install the curl tool to allow command linde downloads from http sources
- install your favorite editor (vim or nano)
- the gnupg key lib
- a tool to show the usage of your system ressources
# need to do this as root as we do not have sudo yet

su -
apt-get update -y
apt-get upgrade -y
apt-get install sudo curl nano vim gnupg2 htop -y
add user roon to sudo group
usermod -aG sudo roonAs we will use a secure shell connection to do all sorts of admin tasks to our new „perfect“ roon core, you might consider to enable passworless login via a certificate.
sudo apt install openssh-server
sudo vim /etc/ssh/sshd_config
uncomment:
PubkeyAuthentication yesCreate SSH Directory and Authorized Keys File:
For the user that will be logging in, ensure that the .ssh directory exists in their home directory and create the authorized_keys file:
[make sure you arre logged in as user roon]
mkdir -p ~/.ssh
touch ~/.ssh/authorized_keys
chmod 700 ~/.ssh
chmod 600 ~/.ssh/authorized_keys
If you use a window machine to administrate your roon server, you may use putty as ssh client:
- First run the PUTTYgen app to generate a new certificate pair
- save public key and private key to a secure place
- INstall the private key within your putty roon session
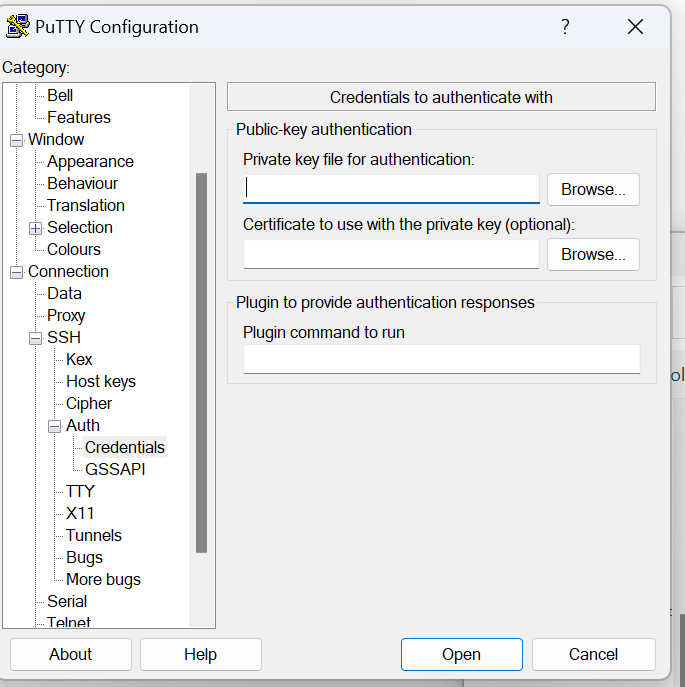
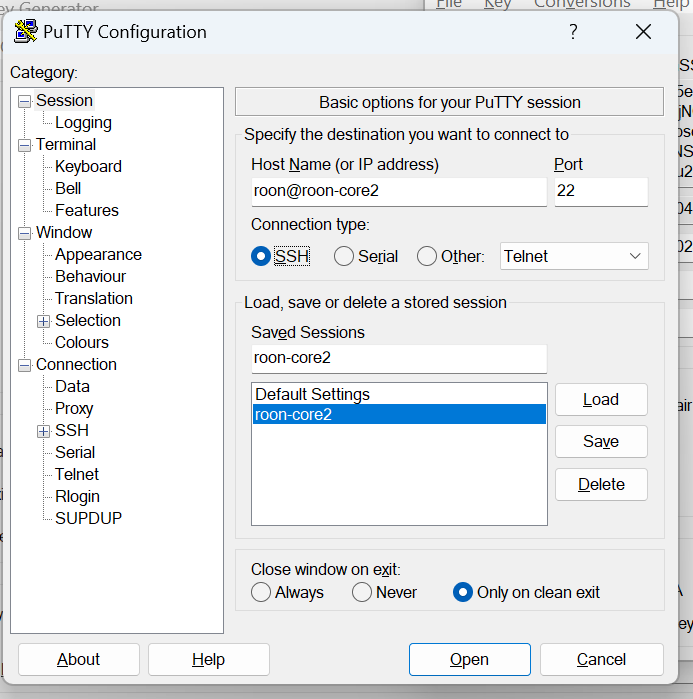
and save the configuration in putty:
Add Public Key:
Add the client’s public SSH key to the authorized keys
You can do this by copying and pasting the key directly into the file.Should be all in one line and drop the rsa-key-xxxxxxx at then end otherwise it will not work!
vim ~/.ssh/authorized_keysRestart the SSH service:
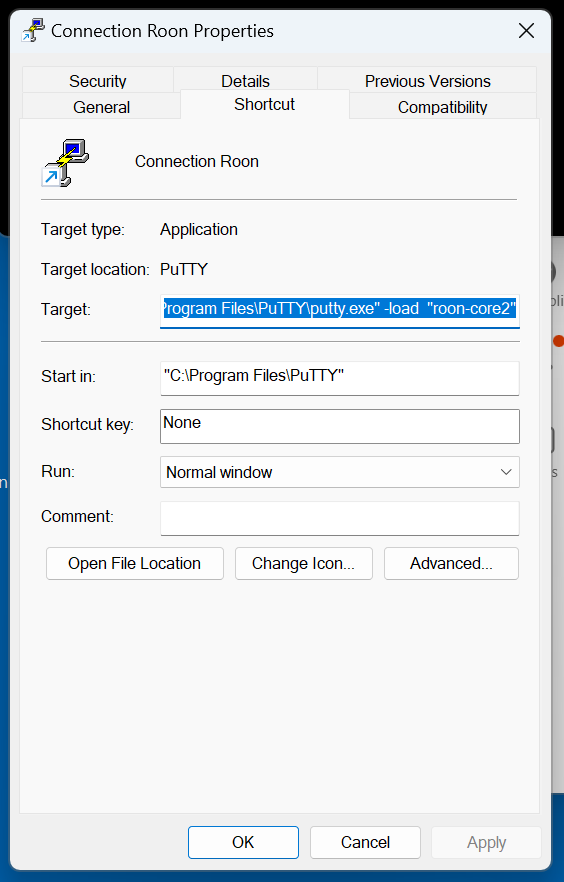
sudo systemctl restart sshyou might do a short cut for your desktop so you can easily do a one click login:
Create a short link with the following parameter, replace „roon-core2“ with the session configuration name you have choosen earlier in putty when saving.
"C:\Program Files\PuTTY\putty.exe" -load "roon-core2"
Finally we are almost there
Installing dependencies for roon core:
sudo apt-get install ffmpeg libasound2 cifs-utils -ynow tun the roon install scripts
curl -O https://download.roonlabs.net/builds/roonserver-installer-linuxx64.sh
chmod +x roonserver-installer-linuxx64.sh
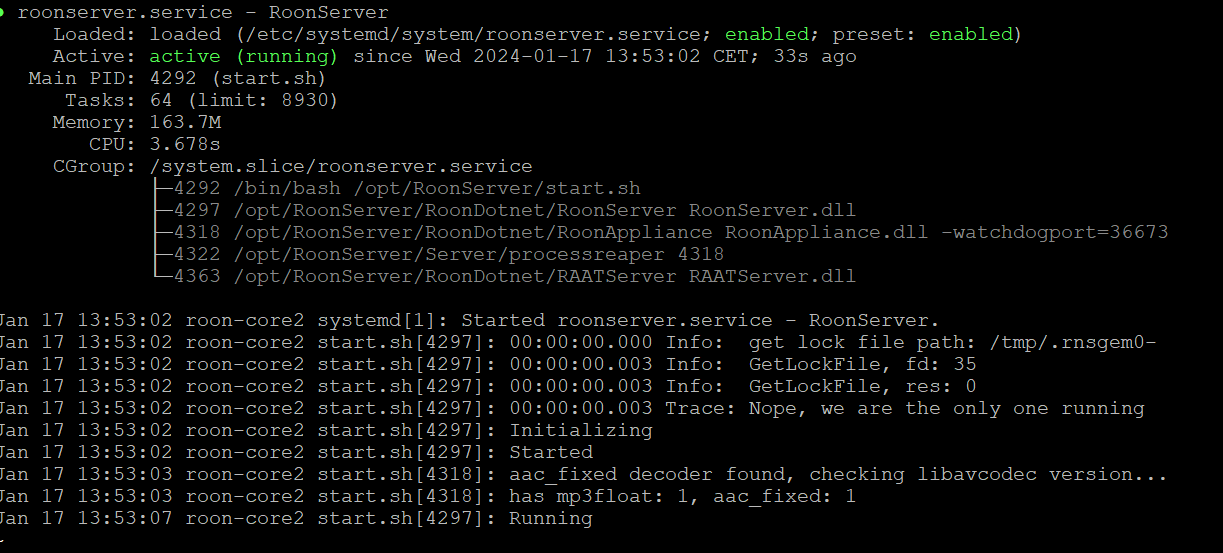
sudo ./roonserver-installer-linuxx64.shstatus
sudo systemctl status roonservershould look similiar to:
stop it with
sudo systemctl stop roonserverYou cann now configure your roon server via a roon client app (IOS/Win/MacOS/Android)
Enable WIFI
On debian 12 network-manager is really working ….
sudo apt-get install network-manager -y
# and find out if it is running
sudo systemctl status NetworkManager
Will output something like this:

find your ssd and connect to it:
nmcli device wifi list
sudo nmcli device wifi connect 'myssd' password 'secret'

nmcli connection show
Let´s make that permanent (you could do this for multiple connections)
# and make it sticky

sudo nmcli connection modify 'apfelhome' connection.autoconnect yes
# and add a high priority

sudo nmcli con modify "apfelhome" connection.autoconnect-priority 100
sudo systemctl restart NetworkManager
and you will find the config in /etc/NetworkManager
Optional configure an hotspot for configurations
configure a hotspot for admin purposes if there is now WLAN:
# Create a new Wi-Fi connection
sudo nmcli con add type wifi ifname wlo1 con-name Hotspot autoconnect yes ssid roon-install

# Set the connection to shared
sudo nmcli con modify Hotspot 802-11-wireless.mode ap 802-11-wireless.band bg ipv4.method shared ipv4.addresses 10.1.0.1/24

# Set the Wi-Fi security
sudo nmcli con modify Hotspot wifi-sec.key-mgmt wpa-psk
#replace Blaubär01with a password of your choice
sudo nmcli con modify Hotspot wifi-sec.psk Blaubär01

# Enable the hotspot
sudo nmcli con up Hotspot
# give it a low priority
sudo nmcli con modify "Hotspot" connection.autoconnect-priority 5
to disconnect :
nmcli device disconnect wlo1if you do not have a secont drive, skip the first part and start with creating the new LV.
Extend a logical Volume Group [only if you have a second drive]
as we decided to use LVM we need to find the unused drive and extend our LVM group with this drive:
sudo lsblkwill help you to find the unused drive
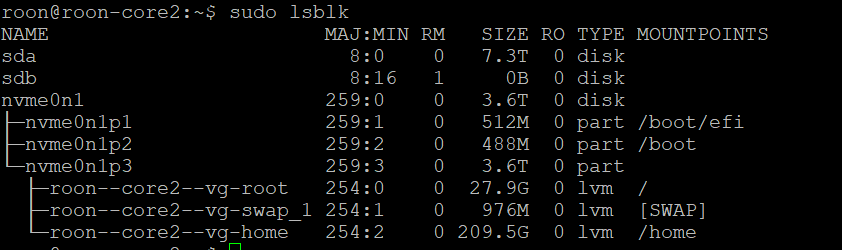
here we would like to use the SSD /dev/sda
Now we create a physical volume (PV) on this drive:
sudo pvcreate /dev/sdaWe find out the name of the volume group we would like to extend:
sudo vgdisplay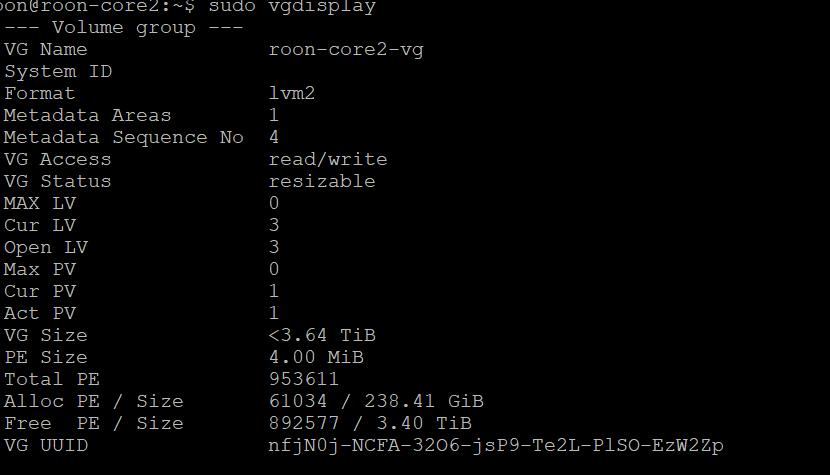
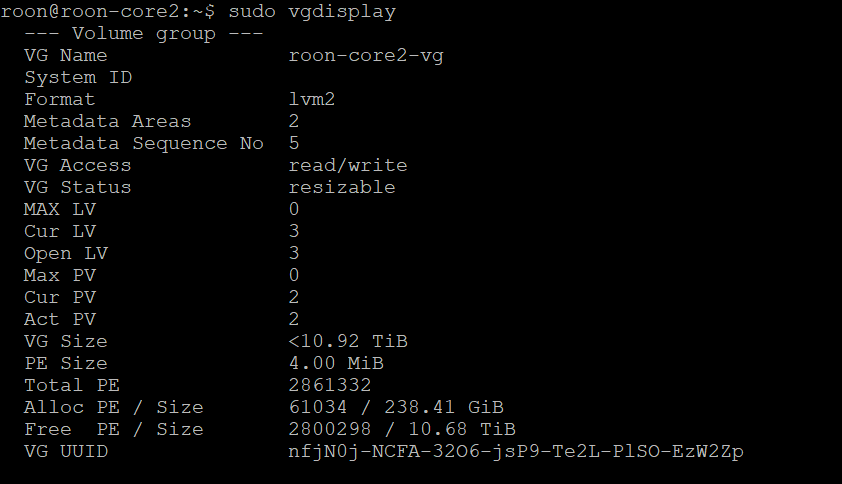
and we extend that group with the newly created PV
sudo vgextend roon-core2-vg /dev/sda

sudo vgdisplay
worked:
Add a new partition for music in the LV [start here if you do not have a second drive]
using all avialable space:
sudo lvcreate -n music -l 100%FREE roon-core2-vg
create the filesystem:
sudo mkfs.ext4 /dev/roon-core2-vg/musiccreate the director to mount the new file system to:
sudo mkdir /mnt/music
now edit the /etc/fstab to include:
/dev/mapper/roon--core2--vg-music /mnt/music ext4 defaults 0 2
sudo vim /etc/fstab
# now remount fstab
mount -a
sudo systemctl daemon-reload
and finaly allow the user roon to access all that newly created space:
sudo chown roon:roon /mnt/music
sudo chmod 700 /mnt/music
sudo chown -R roon:roon /mnt/musicIf you would like to sync data from your NAS to the local disc you might wan´t to mount you NAS or remote volume directly.
install the necessary driver for the remote filesystem and create a mount point:
sudo apt-get install cifs-utils smbclient -y
sudo mkdir -p /mnt/NAS-music
sudo chown -R roon:roon /mnt/NAS-music
# try it out
sudo mount -t cifs //paulus/music /mnt/NAS-music/ -o username=nasuser,password=nasPW
und nun bei Bedarf in die fstab: securely store the credentials:
sudo nano /etc/cifs-credentials
should look like this:
username=your_samba_username
password=your_samba_password
And now adjust the security
sudo chmod 600 /etc/cifs-credentialsnow edit /etc/fstab and test it
sudo vim /etc/fstab
add
//yourNAS/yourShare /mnt/NAS-music cifs noauto,x-systemd.automount,x-systemd.requires=network-online.target,_netdev,credentials=/etc/cifs-credentials,iocharset=utf8,sec=ntlmssp,ro 0 0
reload and test :
sudo systemctl daemon-reload
sudo systemctl restart remote-fs.target
df -hwe will use rsync to do this (works with mounted USB drives as well)
sudo apt-get install rsyncnow we automize it:
create sync script:
nano ~/sync_music.sh#!/bin/bash
rsync -av --progress /mnt/NAS-music/ /mnt/music/
dont´forget to make it executable
chmod +x sync_music.sh
~/sync_music.sh
This script might run for a very long time… To make it independent from your session you may use a terminal multiplexer called tmux. You find more details at the endo of the following article:
10 Maintenance – Hauptsache es klingt ! (apfelbeck.at)
try the following Kernel Parameter to disable faulty APCMI
nvme_core.default_ps_max_latency_us=0 pcie_aspm=off
to use edit: /etc/default/grub
add to
GRUB_CMDLINE_LINUX_DEFAULT="quiet splash nvme_core.default_ps_max_latency_us=0 pcie_aspm=off"
and activate:
sudo update-grubYou would like to use an attached display to show the ROON web display? Don´t do it on low powerd machines
# add a dedicated user for it
sudo useradd -m roon-display
sudo passwd roon-display
# and now install some lightwight X enviroment
sudo apt-get install xorg chromium openbox lightdm xdotool unclutter
# thisis evil
sudo mv /etc/pam.d/lightdm-autologin /etc/pam.d/lightdm

# and edit the lightdm.comf
sudo nano /etc/lightdm/lightdm.conf
modify the following section
[Seat:*]
autologin-user=roon-display
user-session=openbox
Now we configure a very basic window manager called openbox for the autologin user.
mkdir -p ~/.config/openboxnano ~/.config/openbox/autostartand add the following content
xset s off
xset -dpms
xset s noblank
unclutter -display 0:0 -noevents -grab

chromium \
    --disable-gpu \
    --no-first-run \
    --disable \
    --disable-translate \
    --disable-infobars \
    --disable-suggestions-service \
    --disable-save-password-bubble \
    --start-maximized \
    --kiosk "http://localhost:9330/display/" &
The –disable-gpu option took me quite some time to find out. The Mesa Driver for the Iris XE integrated INTEL processor graphic used in combination with the chromium browser has a rendering bug in combination deploying two SODIMMs (thus enable dual channel DRAM access)
Added unclutter to hide the Mouse Pointer.
We should reconnect – here every 5 Minutes – from time to time (is it a bug or feature ?)
as user roon-display do (important needs to be executed in the right user context)
crontab -eand add
*/5 * * * * DISPLAY=:0 /home/roon-display/crontabrefresh.shand now we create a script for it
nano ~/crontabrefresh.sh
#!/bin/bash
xdotool key shift+F5
and make it executable
chmod +x ~/crontabrefresh.sh
Now install nftables as firewall:
sudo apt-get install nftables -y
start it
sudo systemctl enable nftables.service
sudo systemctl start nftables
sudo systemctl status nftables
edit your /etc/nftables.rules
sudo nano /etc/nftables.rules# Define your local LAN Subnet
define lan = 192.168.1.0/24
define loopback = "lo"
table inet filter {
chain input {
type filter hook input priority filter; policy drop;
# let´s be statefull
ct state established,related accept
# Needed for ROON Server
iifname $loopback counter accept
meta pkttype multicast counter accept
meta pkttype broadcast counter accept
# allow ssh access
tcp dport 22 accept
# roon comms
ip saddr $lan udp dport 9003 counter accept
ip saddr $lan tcp dport 9300-9339 counter accept
# Apple Airplay
ip saddr $lan udp dport 32768-65535 counter accept
# Devialet Air
ip saddr $lan tcp dport 32768-65535 counter accept
log prefix "nftables: " flags all
}
chain output {
type filter hook output priority filter; policy accept;
}
}
Let´s see if it worked:
sudo nano /etc/nftables.conf
should look like:
#!/usr/sbin/nft -f

flush ruleset
include "/etc/nftables.rules"
and finaly test it by restarting
sudo systemctl restart nftables
sudo nft -s list ruleset
and to see the firewal log for bug fixing:
sudo journalctl -f -k | grep 'nftables'
or see the history:
sudo journalctl -k | grep 'nftables'various topic and tools to ease the trouble shooting:
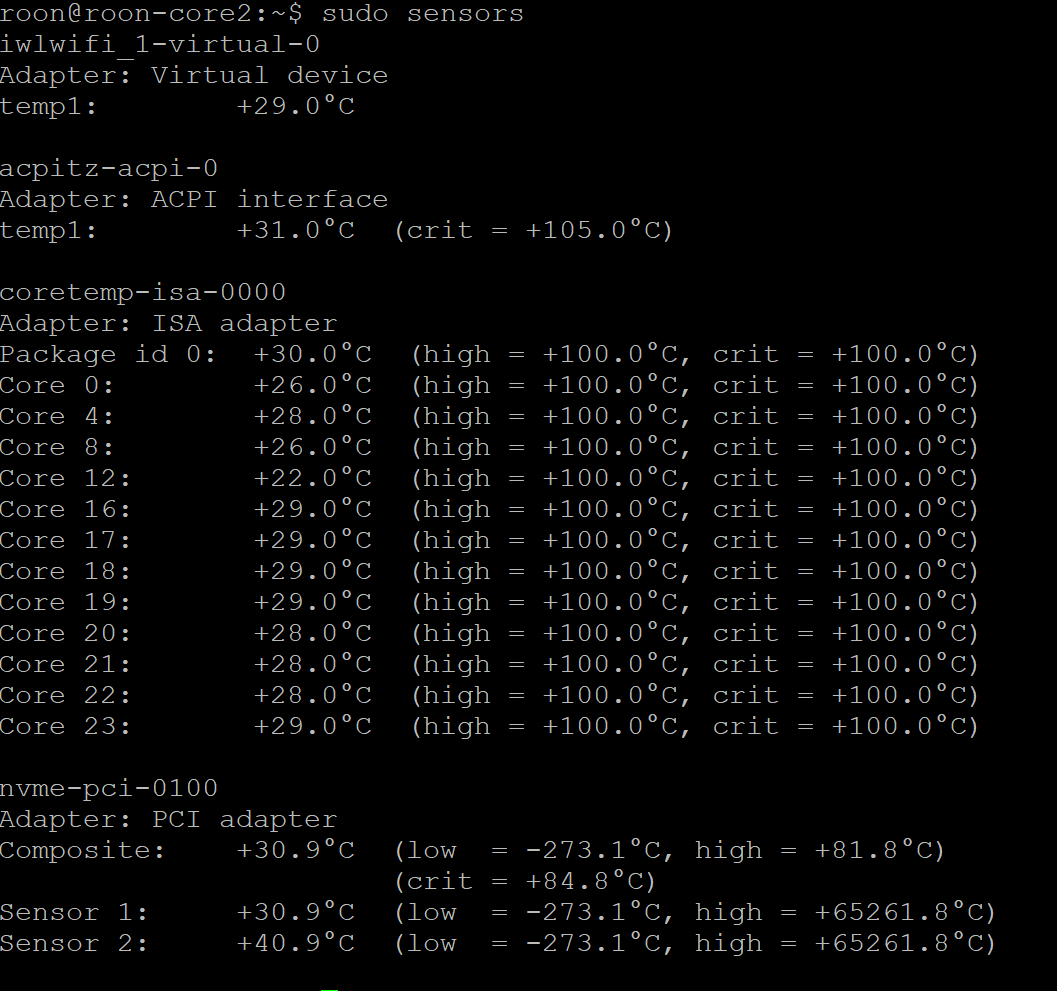
Temperature Measurement
as many of us want to use passively cooled system, looking at the various temperature sensors deployed in the system is helpfull:
sudo apt install lm-sensors
sudo sensors-detect --auto
sudo sensors
my passively cooled NUC 13 stays nice and cool even while indexing:
Checking System Ressource Usage
you may stop it with CTRL-C
sudo htop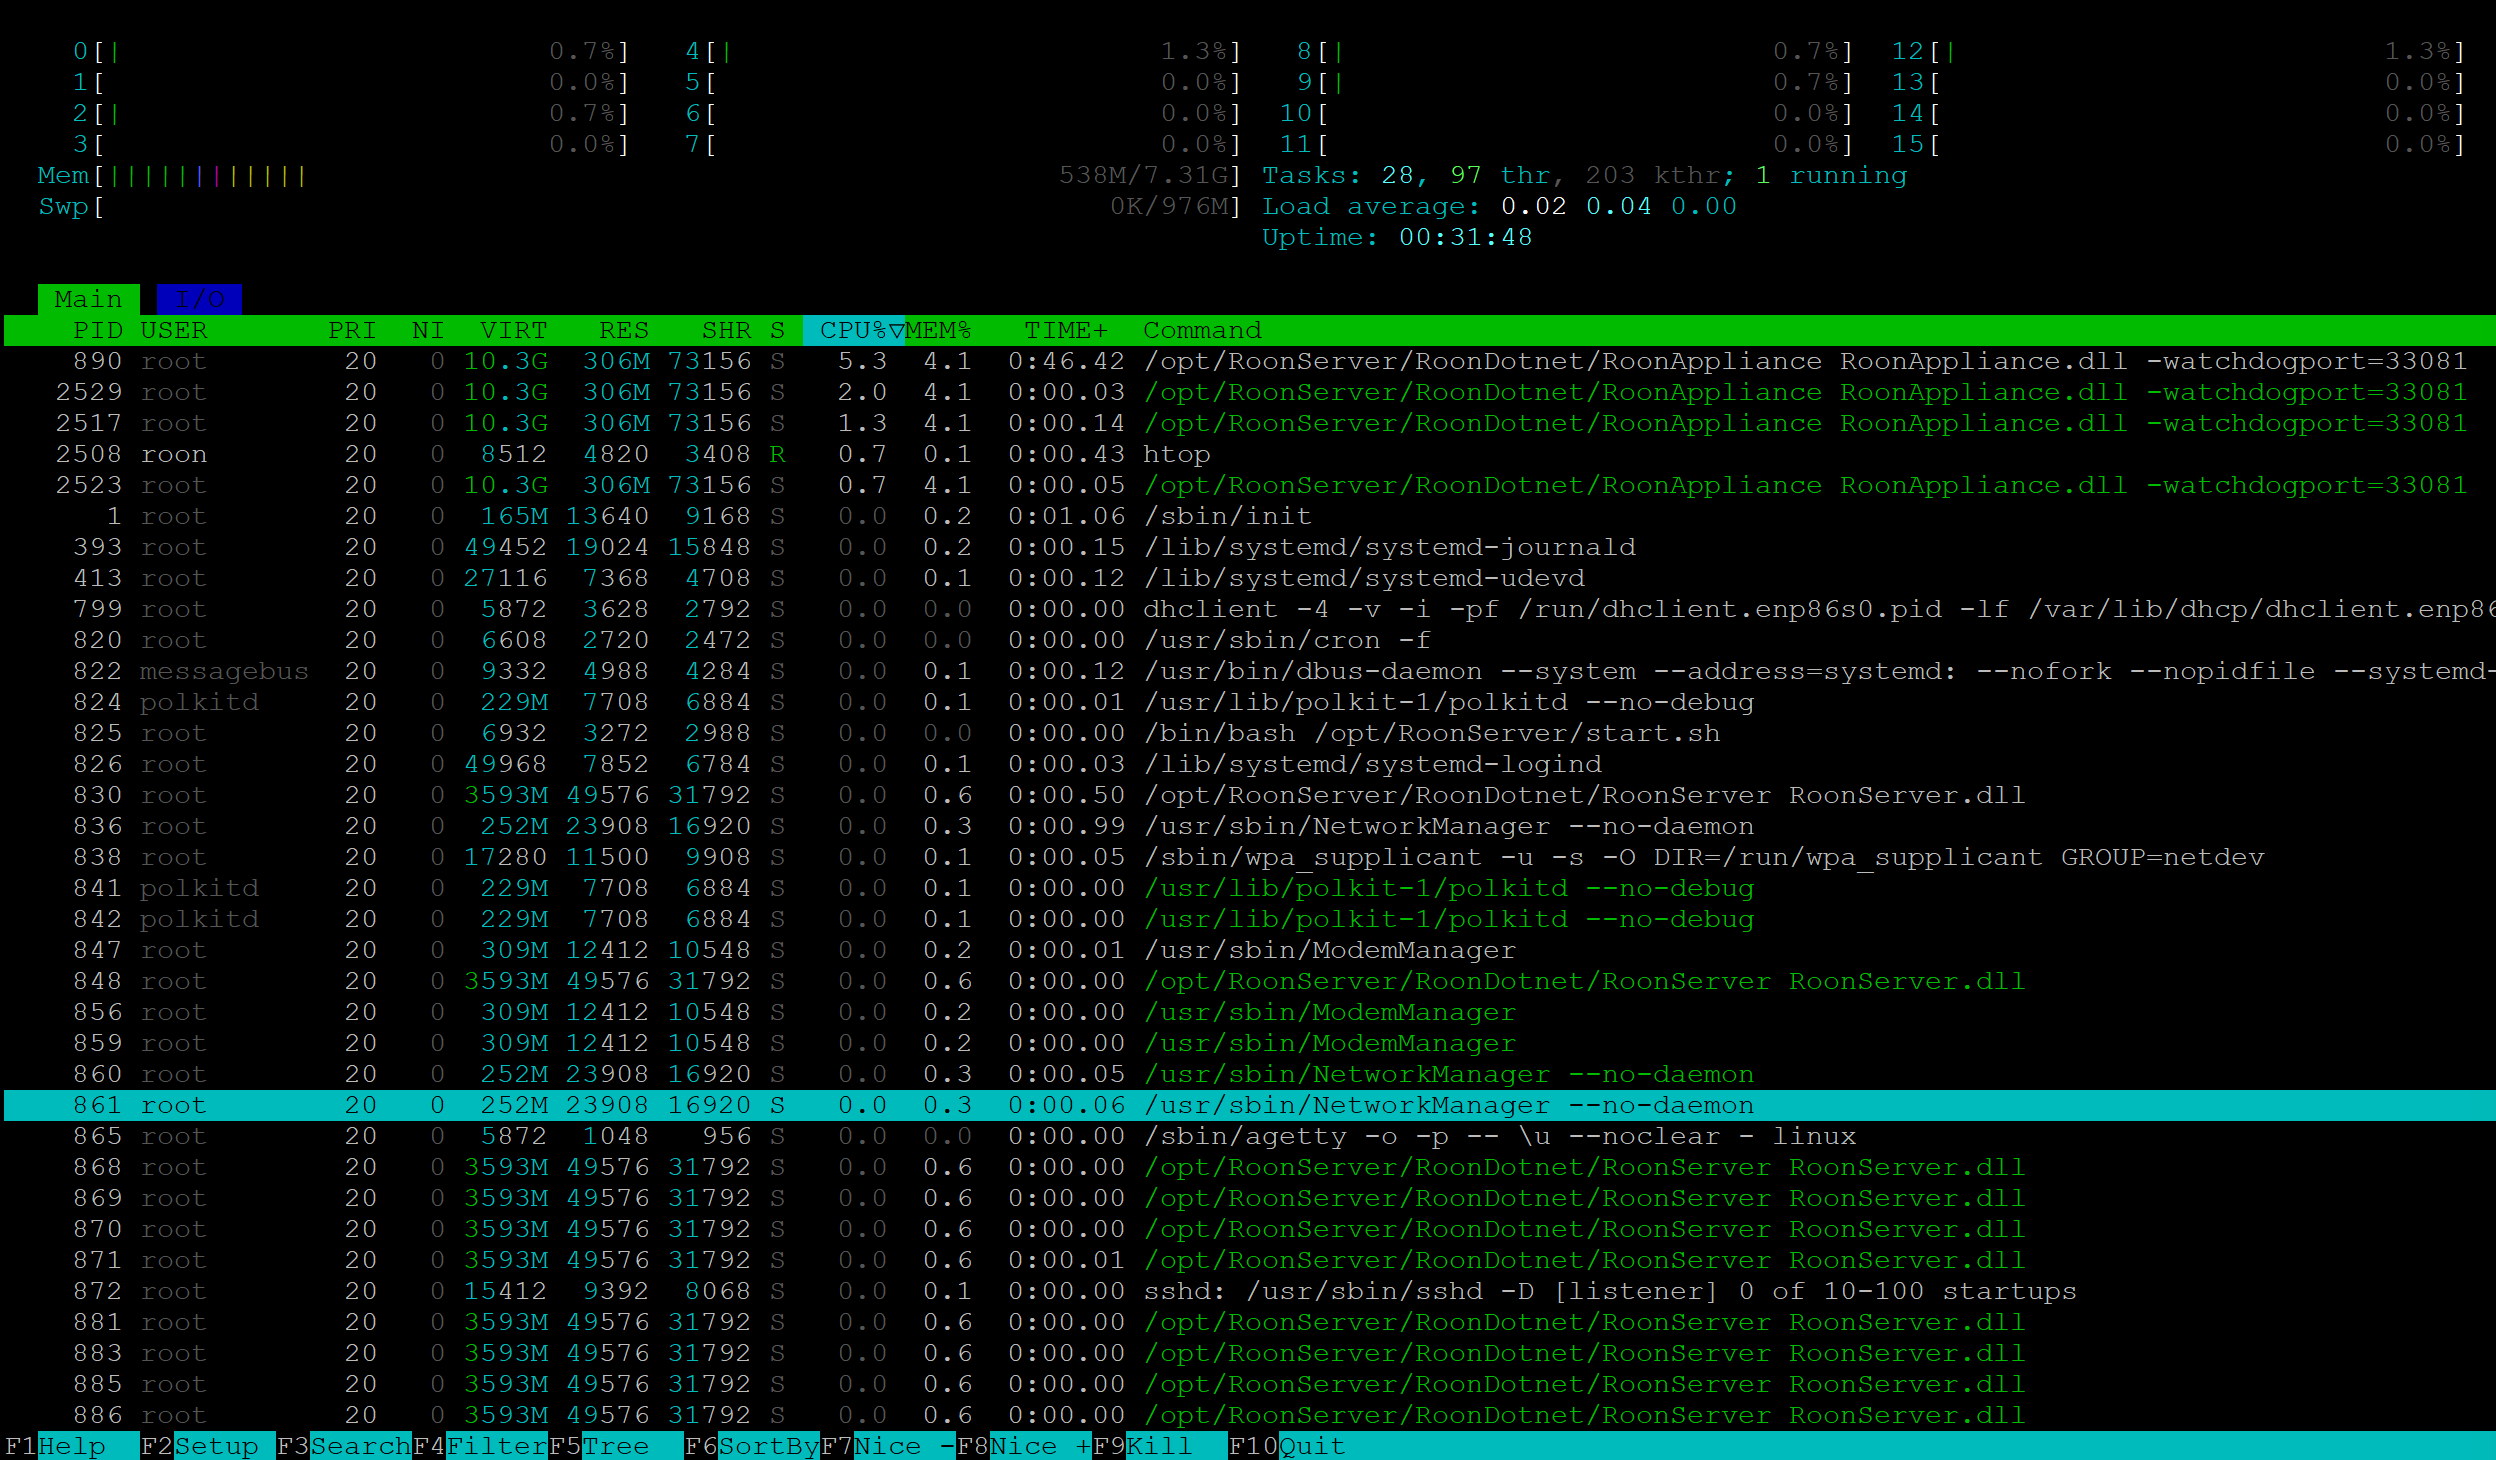
Logging……
We have to get used to systemd and the logging and service management. Here some hints where to find logs
Roonserver and Raatserver logs can be found:
# Everything regarding the Management of your music, Desktop,....
/var/roon/RoonServer/Logs
# Audio Backbone : (Roon Advanced Audio Transport
/var/roon/RAATServer/Logs
You may to use journalctl to derive logging of the roonserver systemd unit.
sudo journalctl -u roonserver
sudo journalctl -u roonserver To get a list of all services which are running and can be used as filter or to be modified by systemctl:
systemctl | grep runningMost command commands within systemctl
# get the status of a service
sudo systemctl status roonserver
# start the service
sudo systemctl start roonserver
# stop the service
sudo systemctl stop roonserver
# stop and emideatly restart
sudo systemctl restart roonserver
# start service when booting(does not immideatly start it, you have to do it manually if you do not reboot!
sudo systemctl enable roonserver
# disable from autostart
sudo systemctl disable roonserver
Usefull Options for journalctl
# -k gets your the kernel log messages (eg nftables events)
sudo journalctl -k | grep 'nftables'
# while this gives you anything which is related to the service managment
sudo journlctl -u nftables
# there are plenty way to to filter for the event time e.g.
# everything since the last boot
sudo journalctl -b
# specific timestamp
sudo journalctl --since "2023-01-01" --until "2023-01-31"
sudo journalctl --since today
sudo journalctl --since "2024-01-17 12:00:00"

# and to get continous logging to you console use -f
# like tail -f in good old times....
sudo journalctl -kf | grep 'nftables'
Run sessions in your user context tht survive you ssh session
For long running scripts it is helpfull to make a user sesion independent from your ssh conection. Normally your session ends with all running cripts as soon as you disconnect your ssh connection, however there are basiclly two tools to allow you to run „virtual screens“ for session. The traditional one is „screen“ however the more modern and ressource friendly way is „tmux“. You can also run multiple session in one connection.
# install tmux (terminal multiplexer)
sudo apt-get install tmux
# start a new virtual screen
tmux new -s session_name
# after you closed your connection try
tmux ls
# and you find all open virtual windows
# than connectto it
tmux attach -t session_name
# You can also start tmux without any parameters and than do CTRL-B W

# you shall try CTRL-B ? to seel all available shortcuts within a tmux screen
to close all sessions and windows and clean upp (alls sessions will e interrupted
tmux kill-serveryou can modify the sync script like this:
#!/bin/bash

tmux new-session -d -s rsync-session "rsync -av --progress /mnt/NAS-music/ /mnt/music/; tmux kill-session -t rsync-session"
This open a new session -d detached so it can run in the background. After the rsync has been done it will kill this new session.
you may see the progress if you attach yourself with tmux
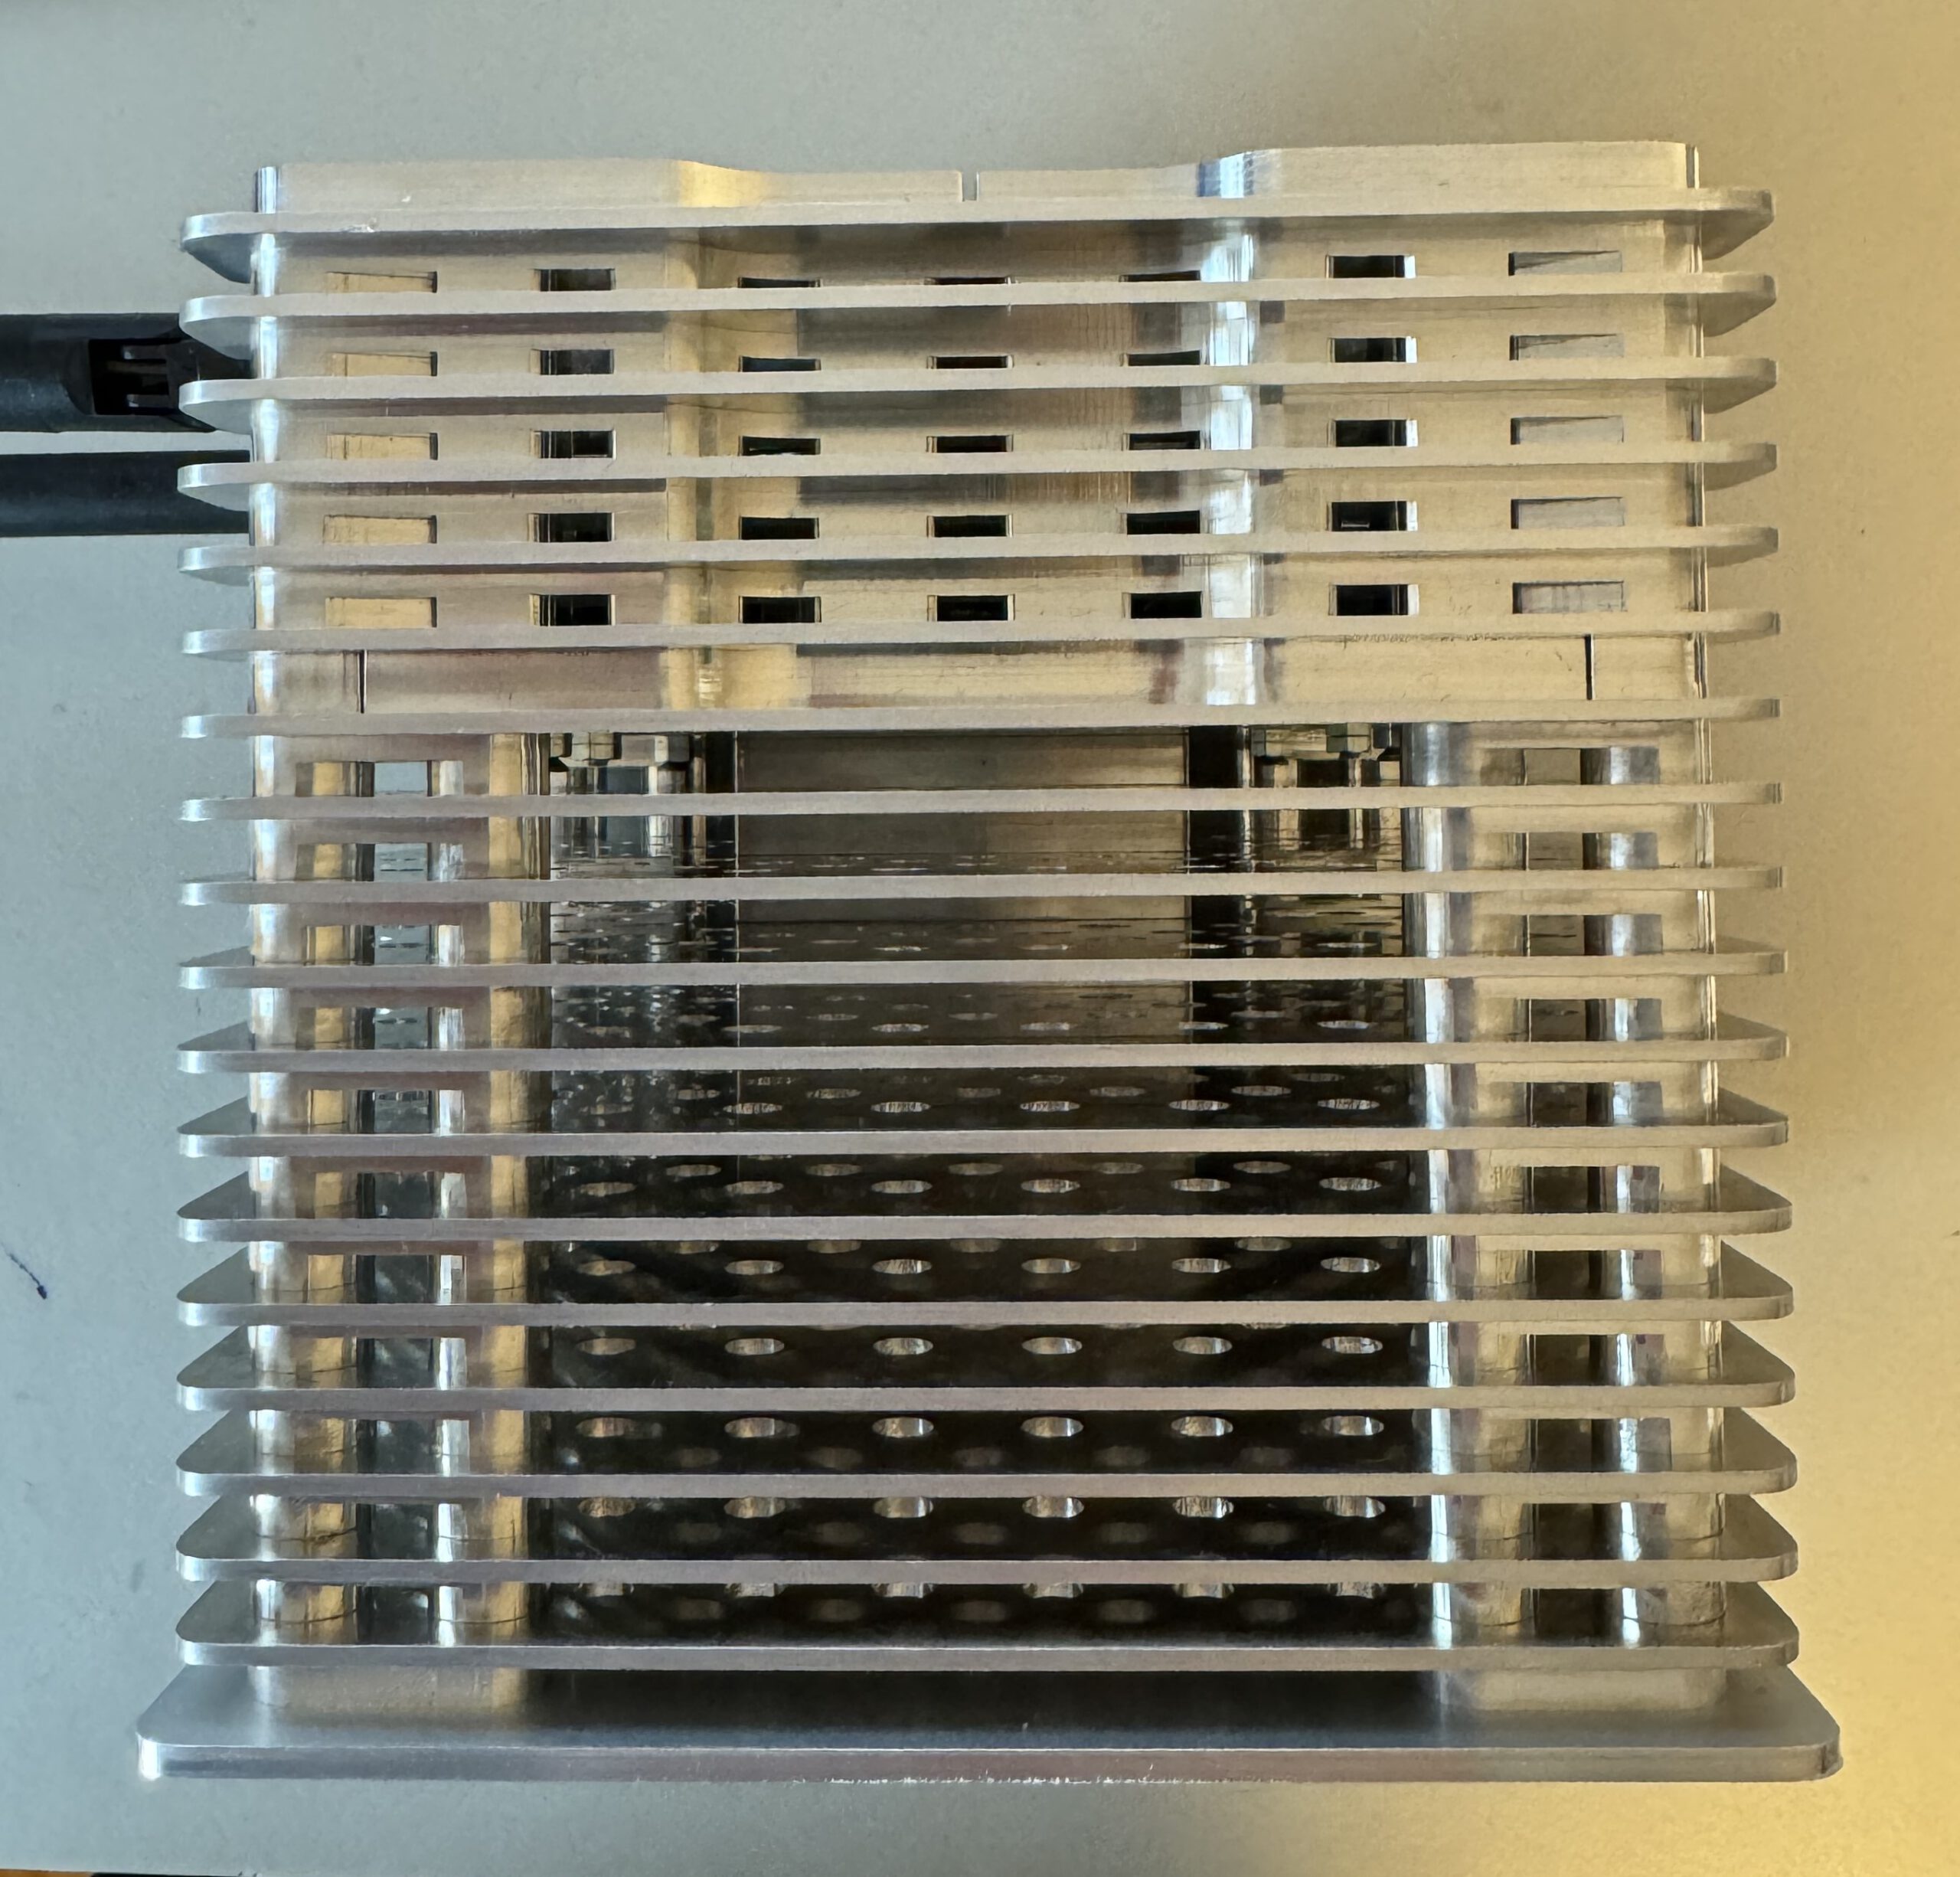
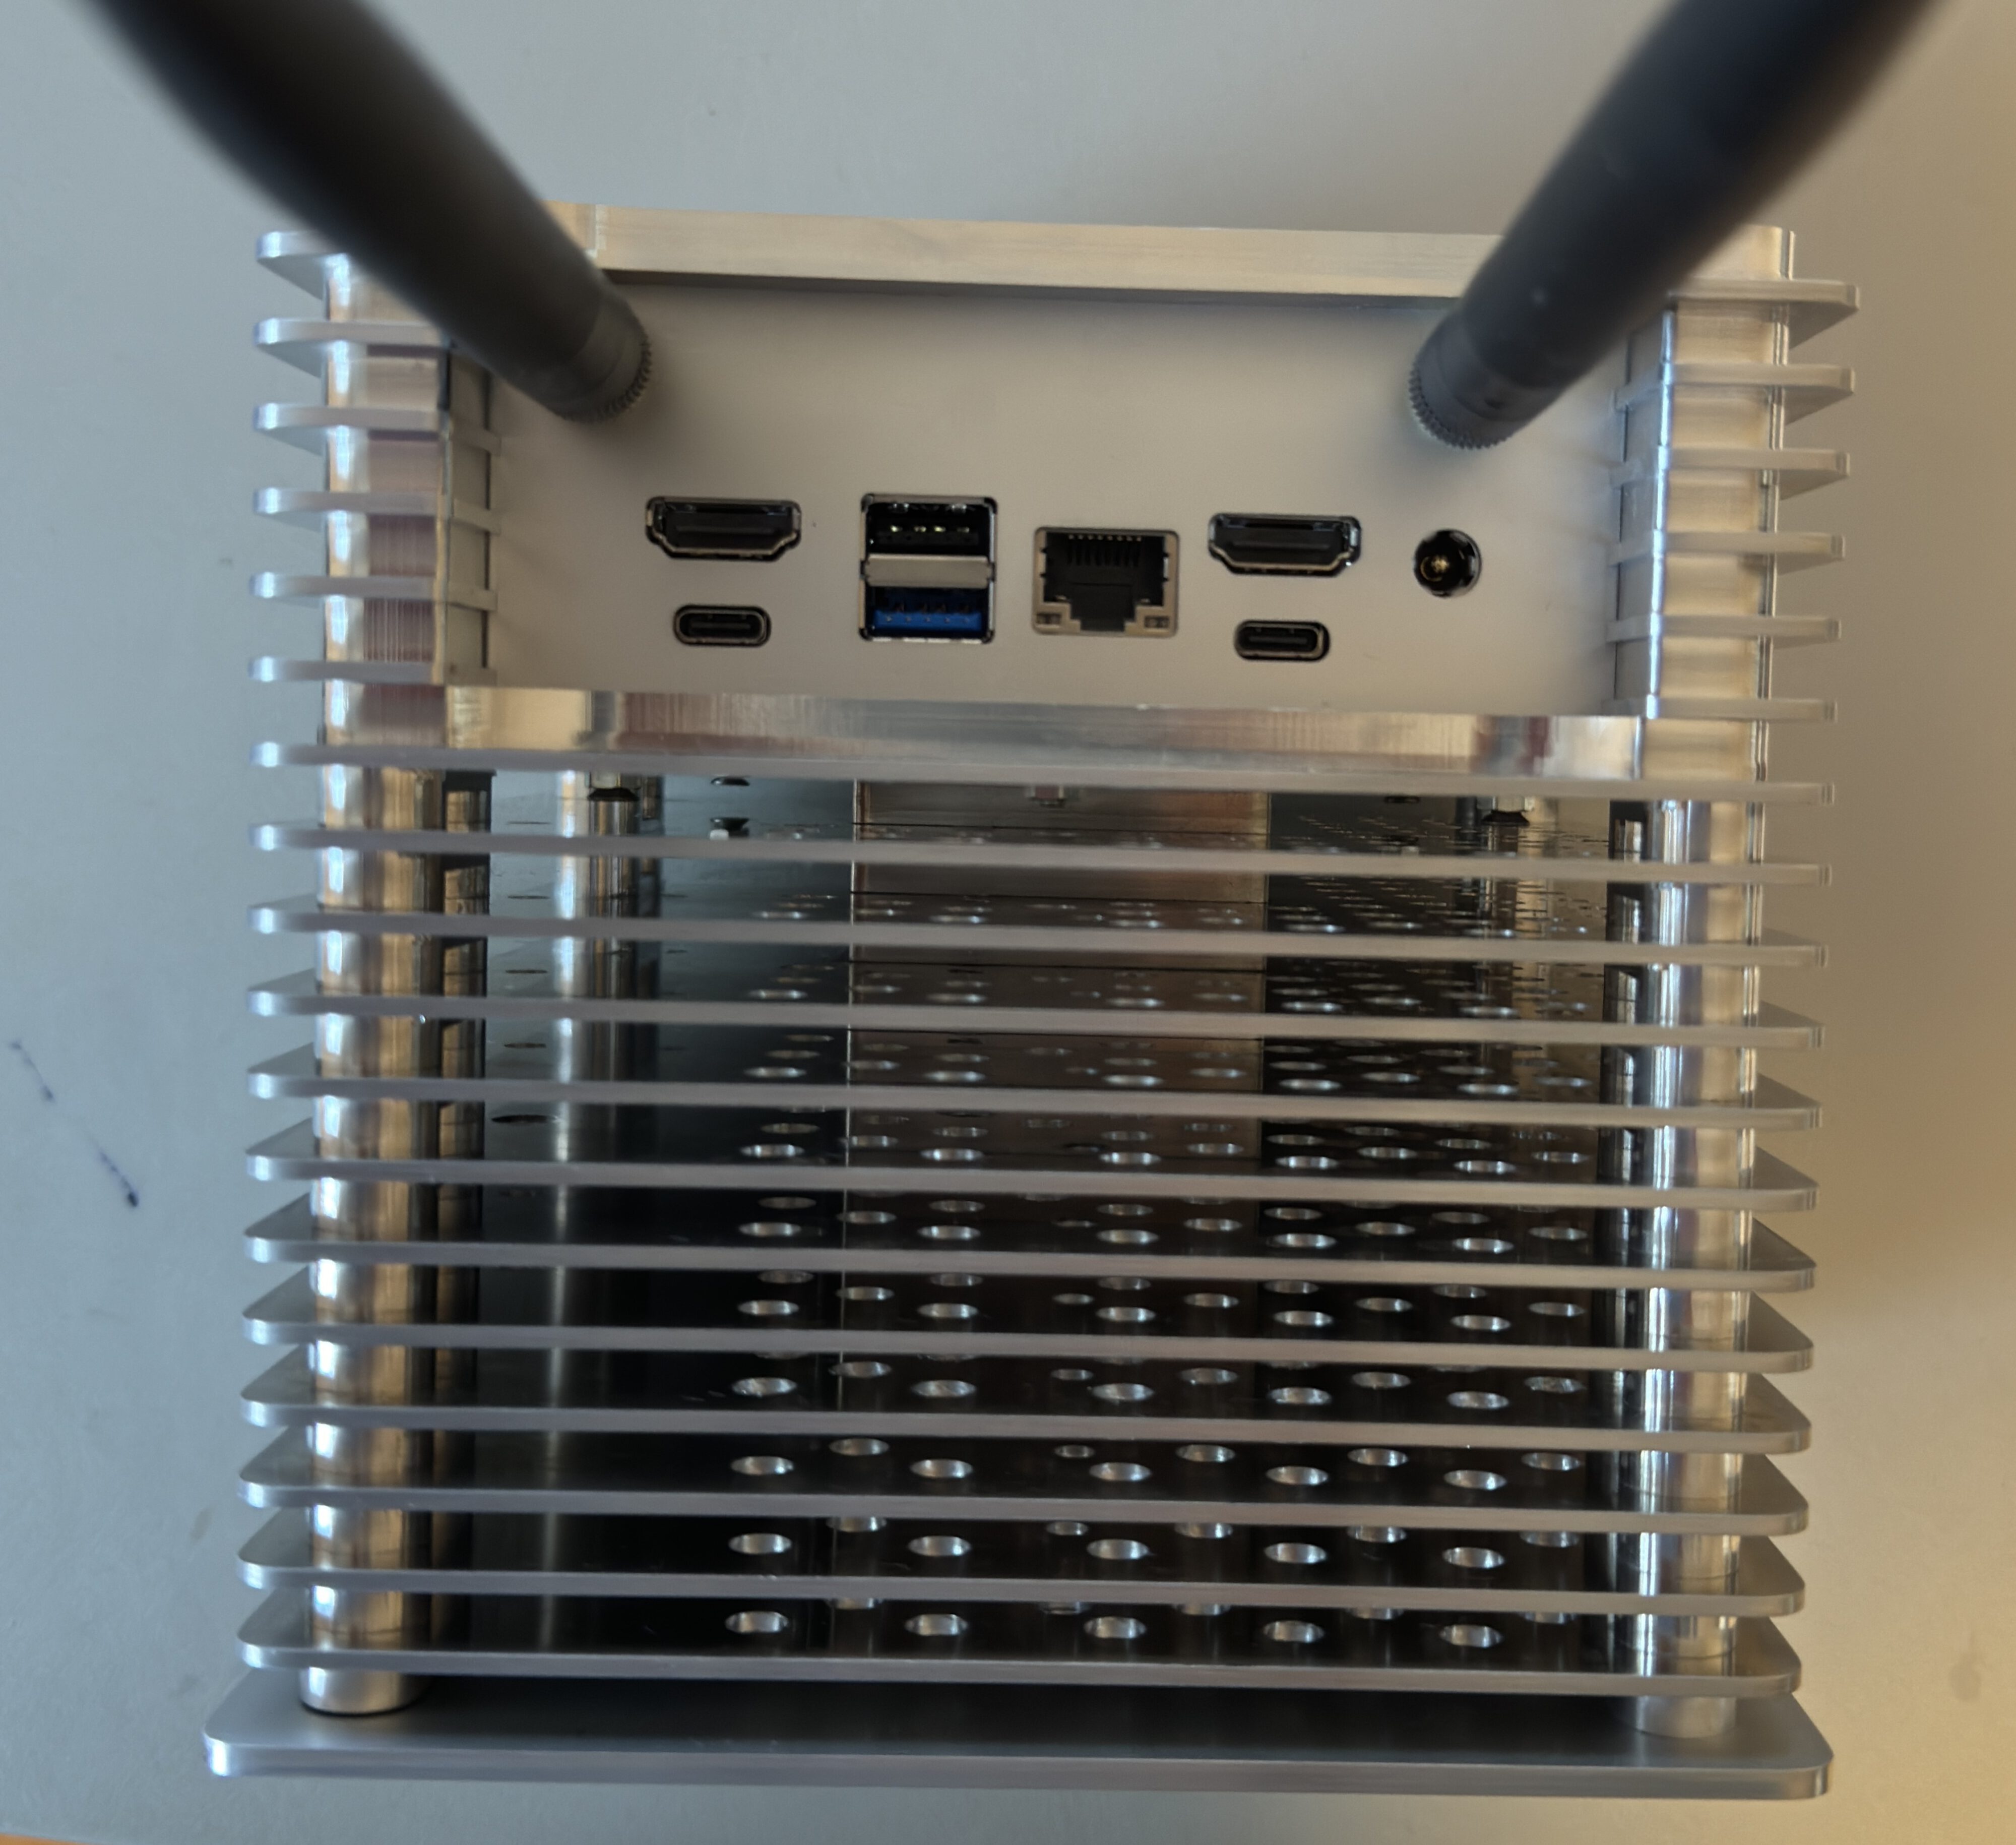
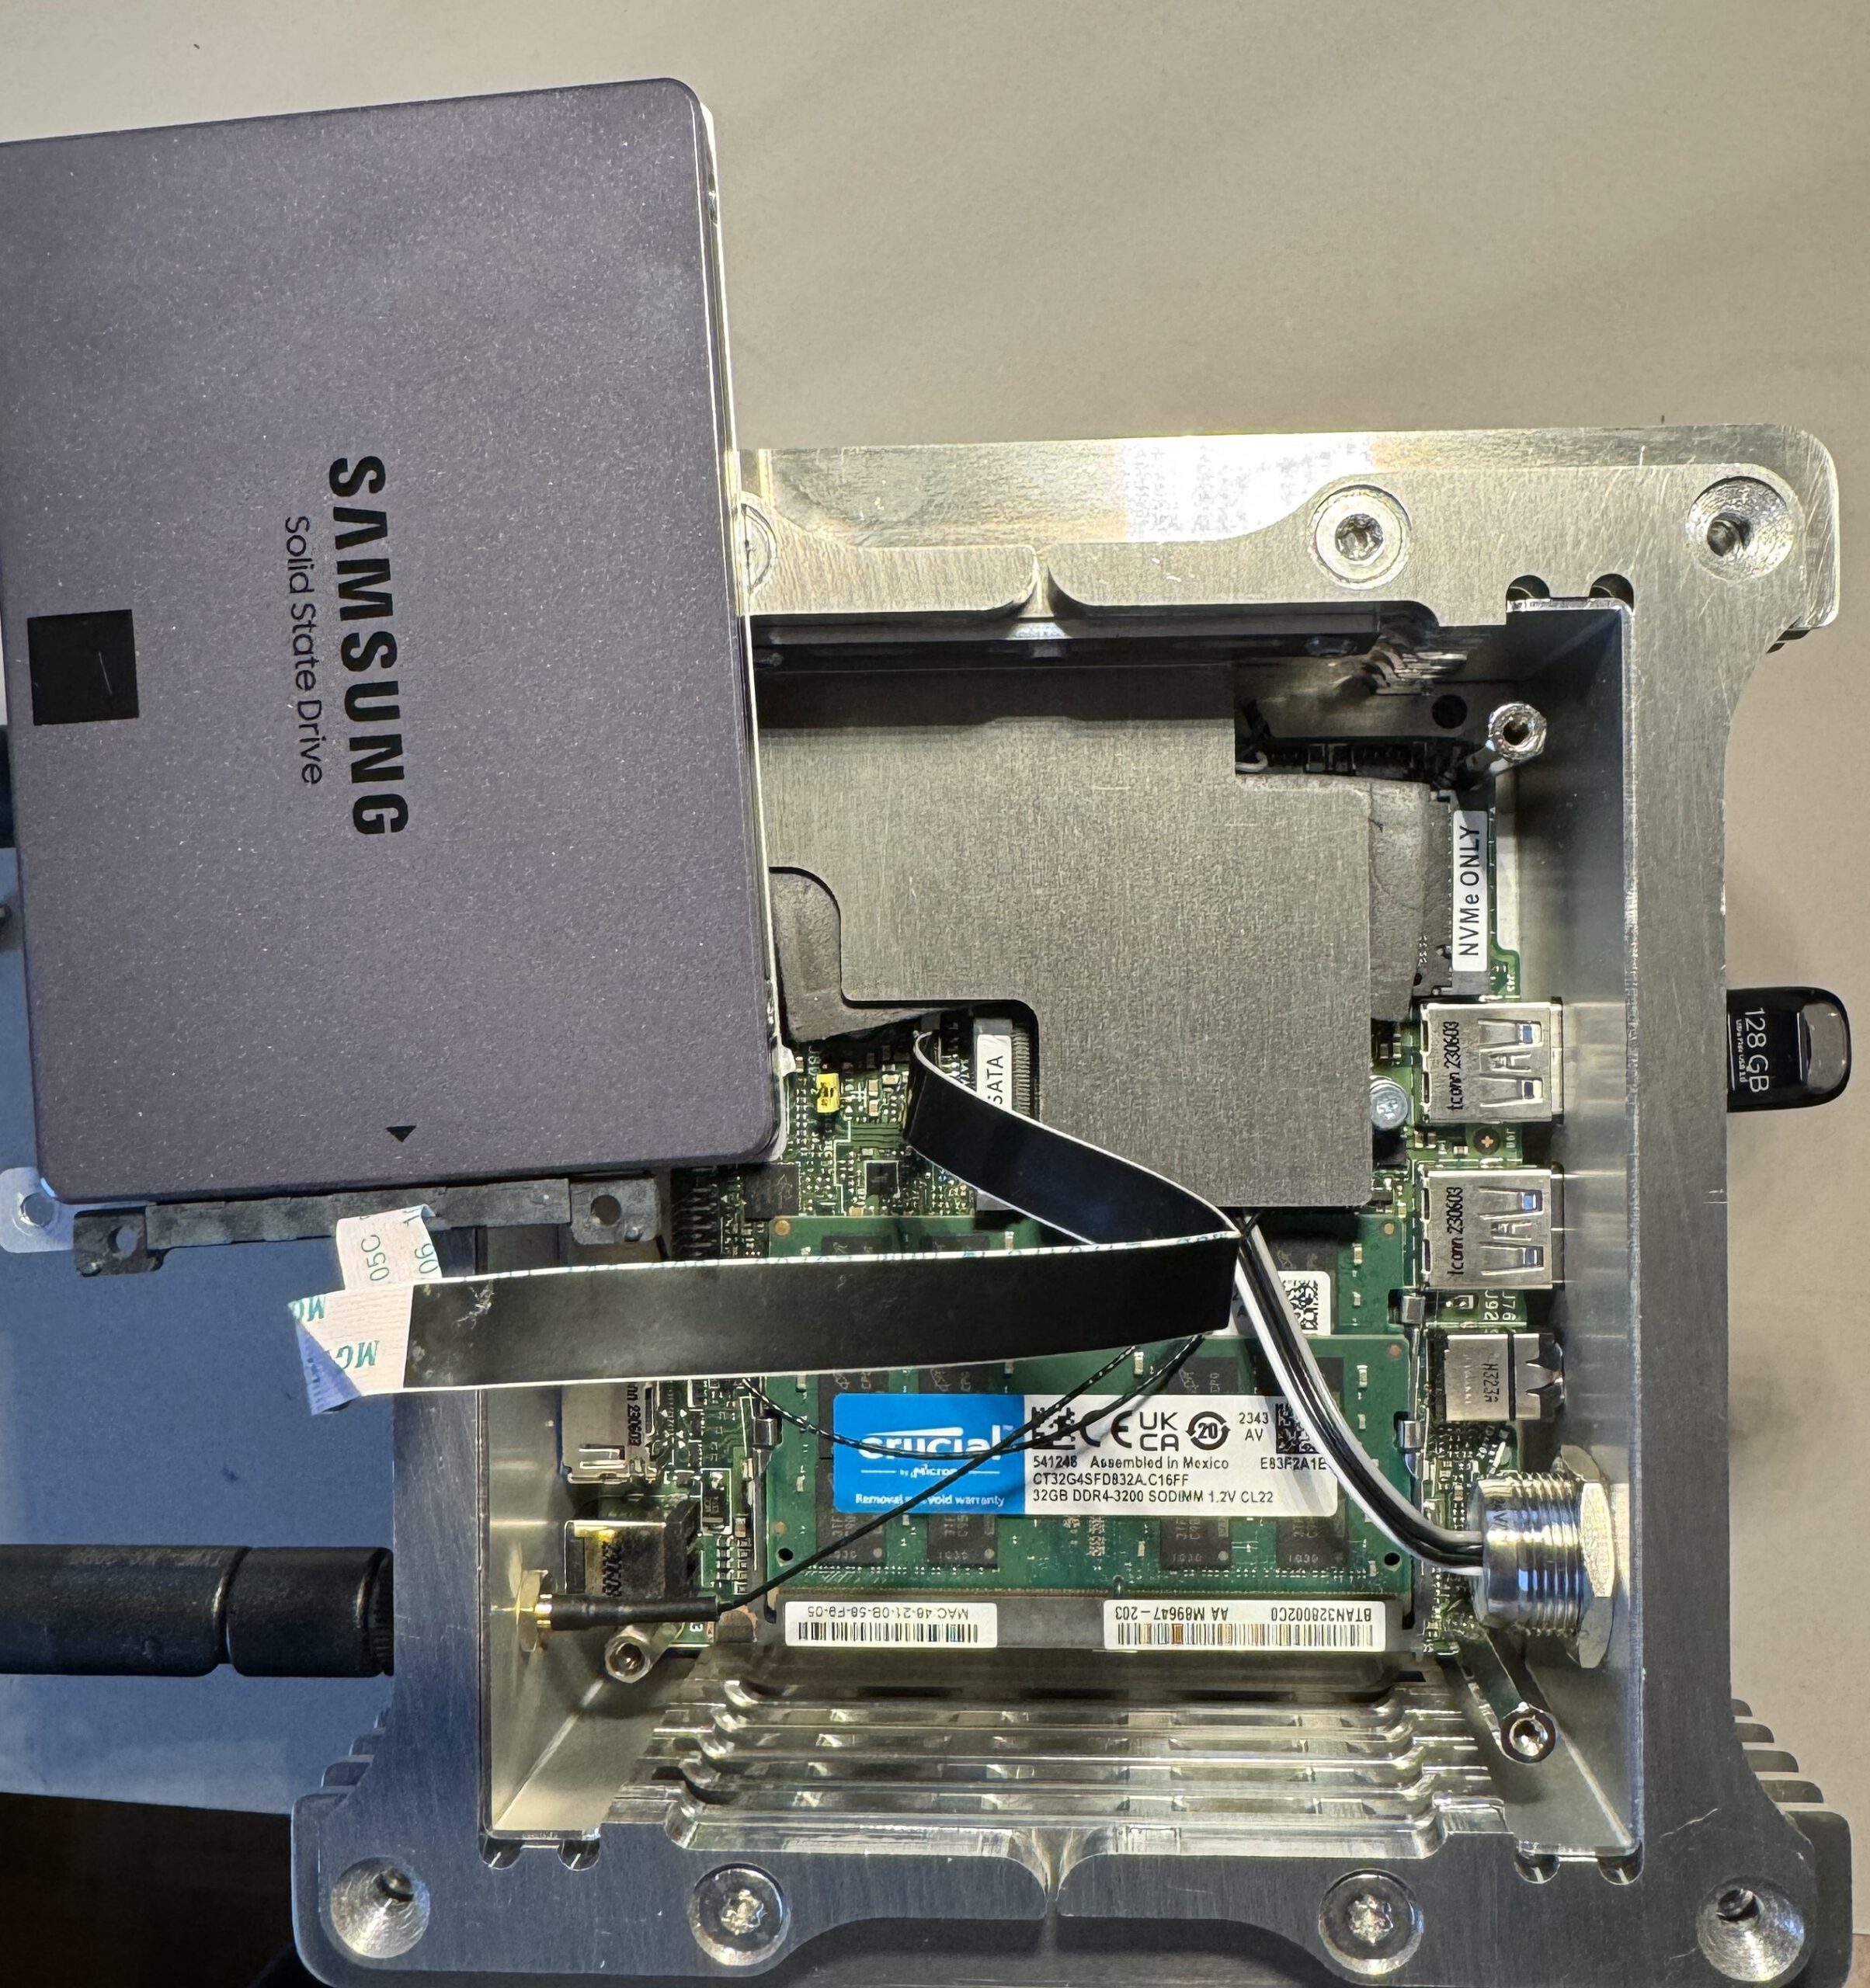
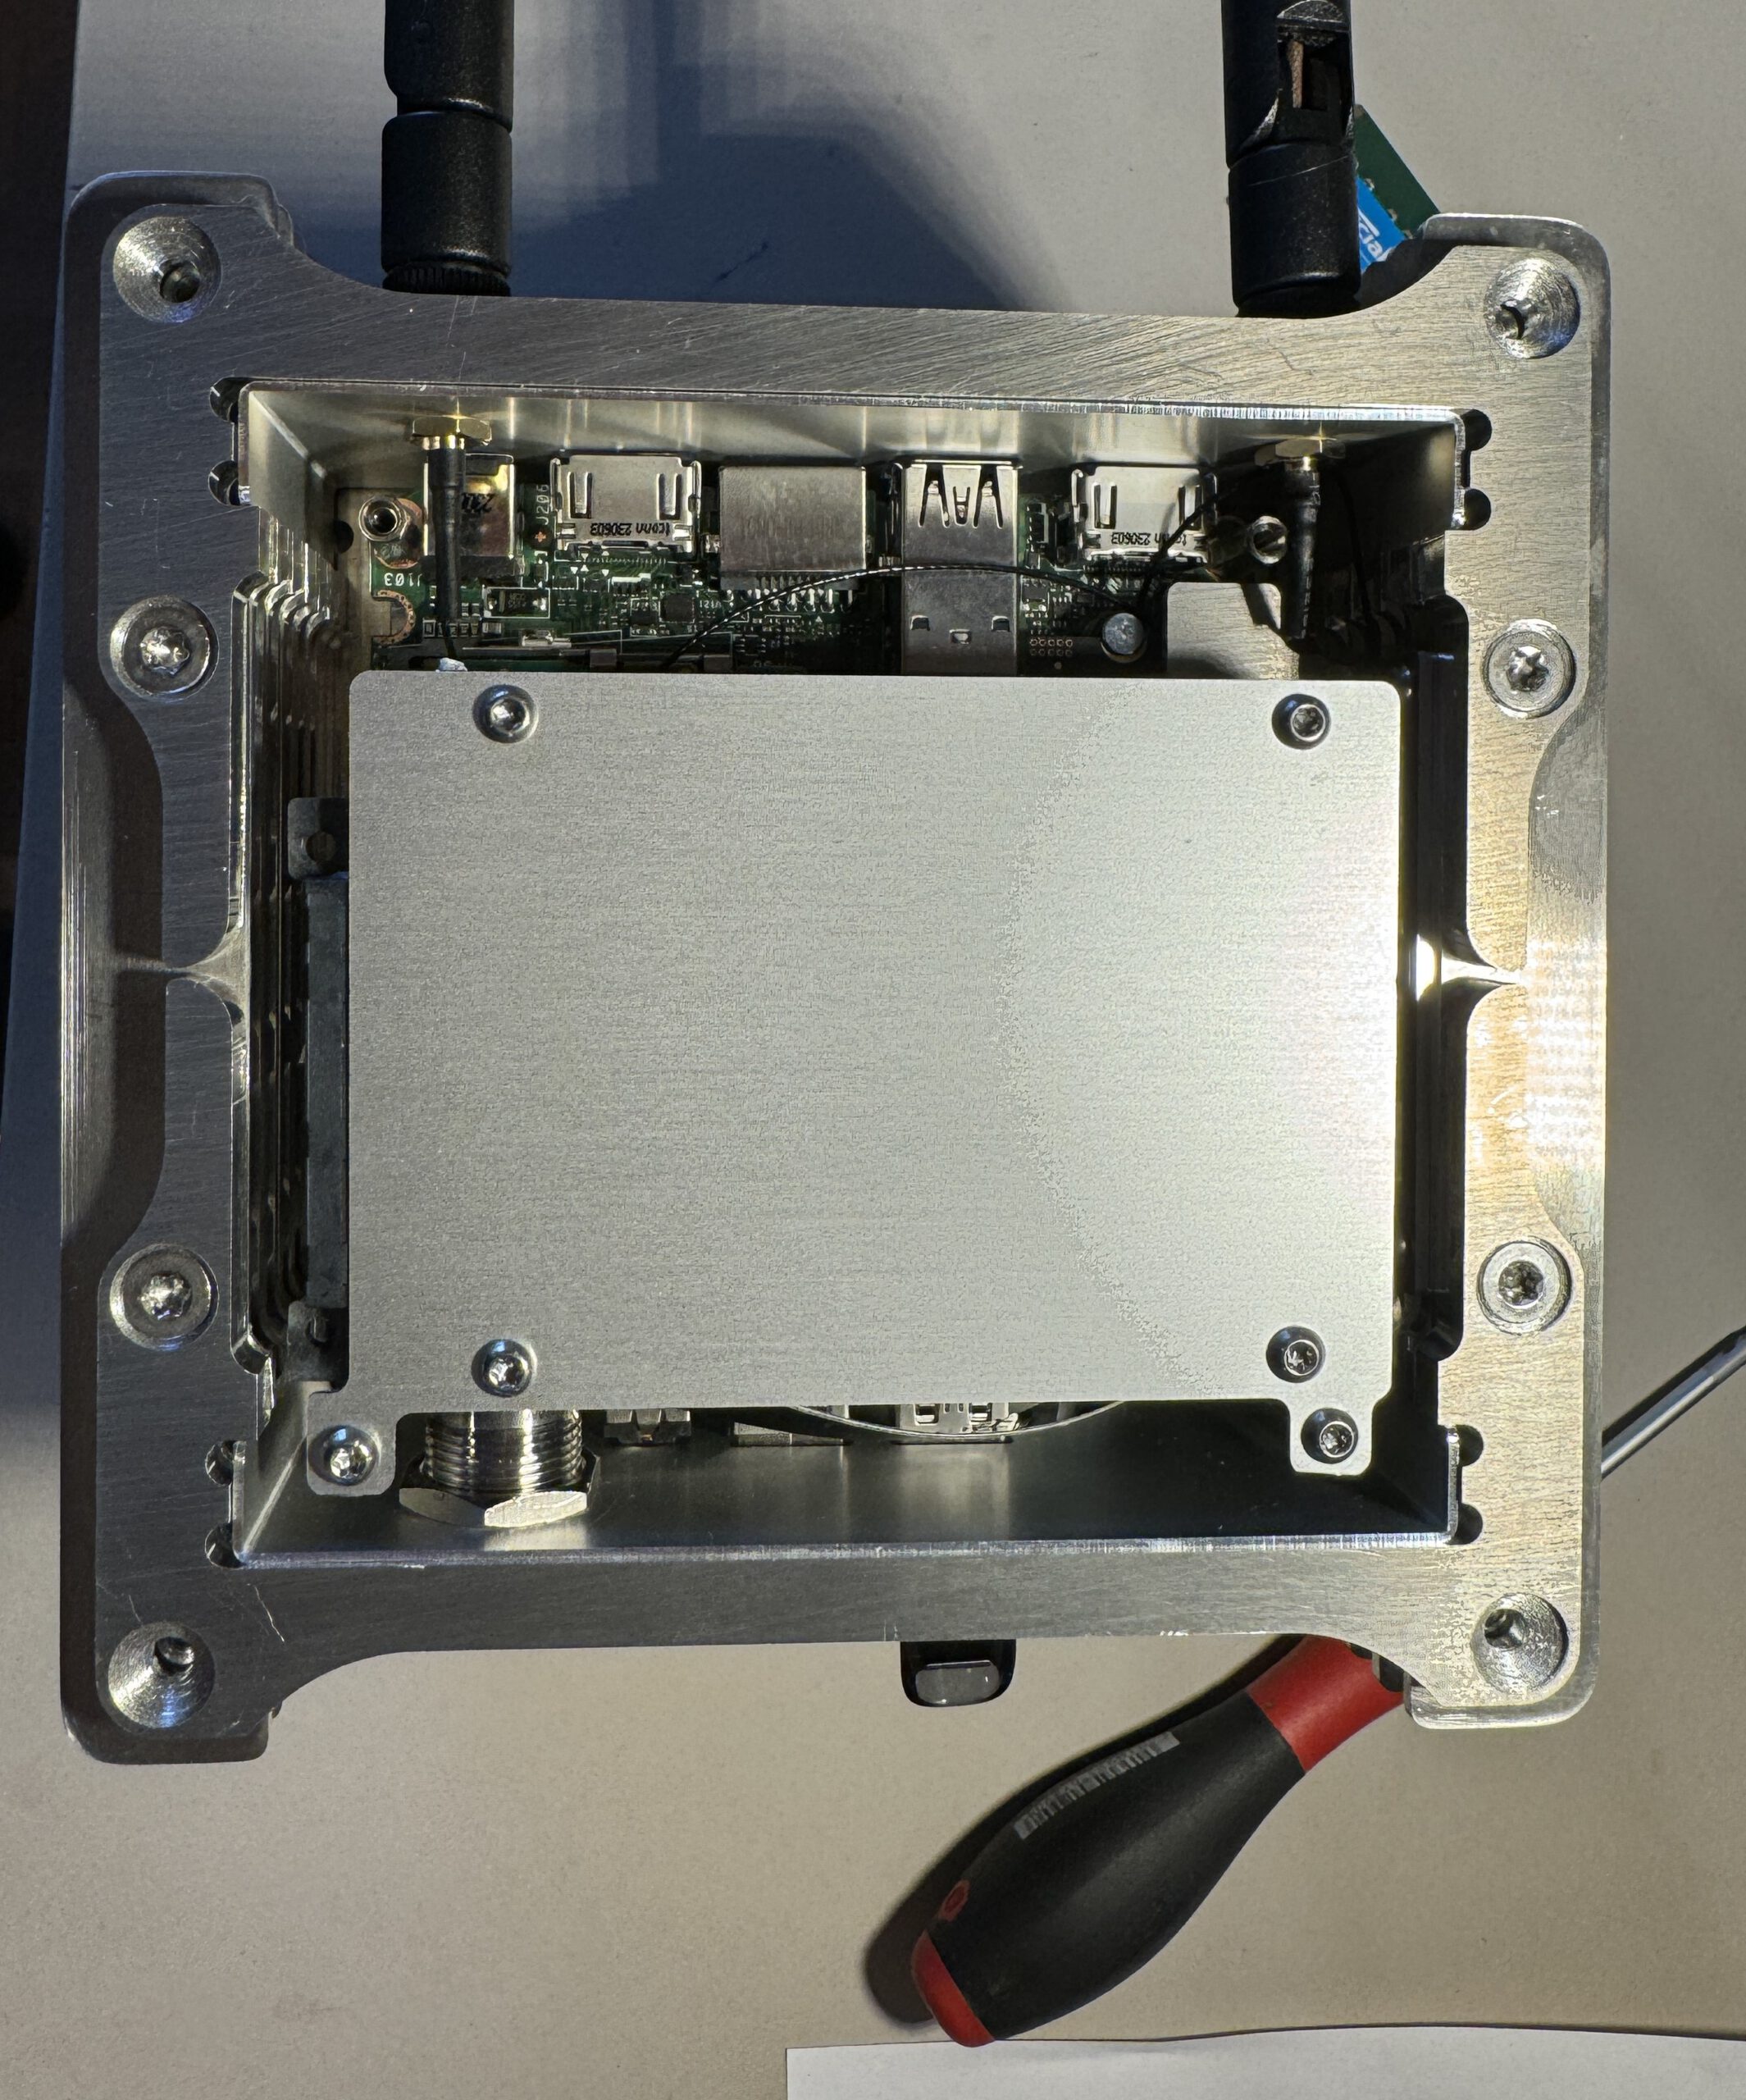
tmux attach -t rsync-sessionAfter using AKASA, HDPLEX and other passive solutions I know ended up with a massive passive case from Cirrus7. Buying the extended cooling option it is hard to get it above 45 Celsius.
Quite happy with the build quality, and one can order them without a logo.
cirrus7 nimbini – Finally a really silent Intel® NUC system

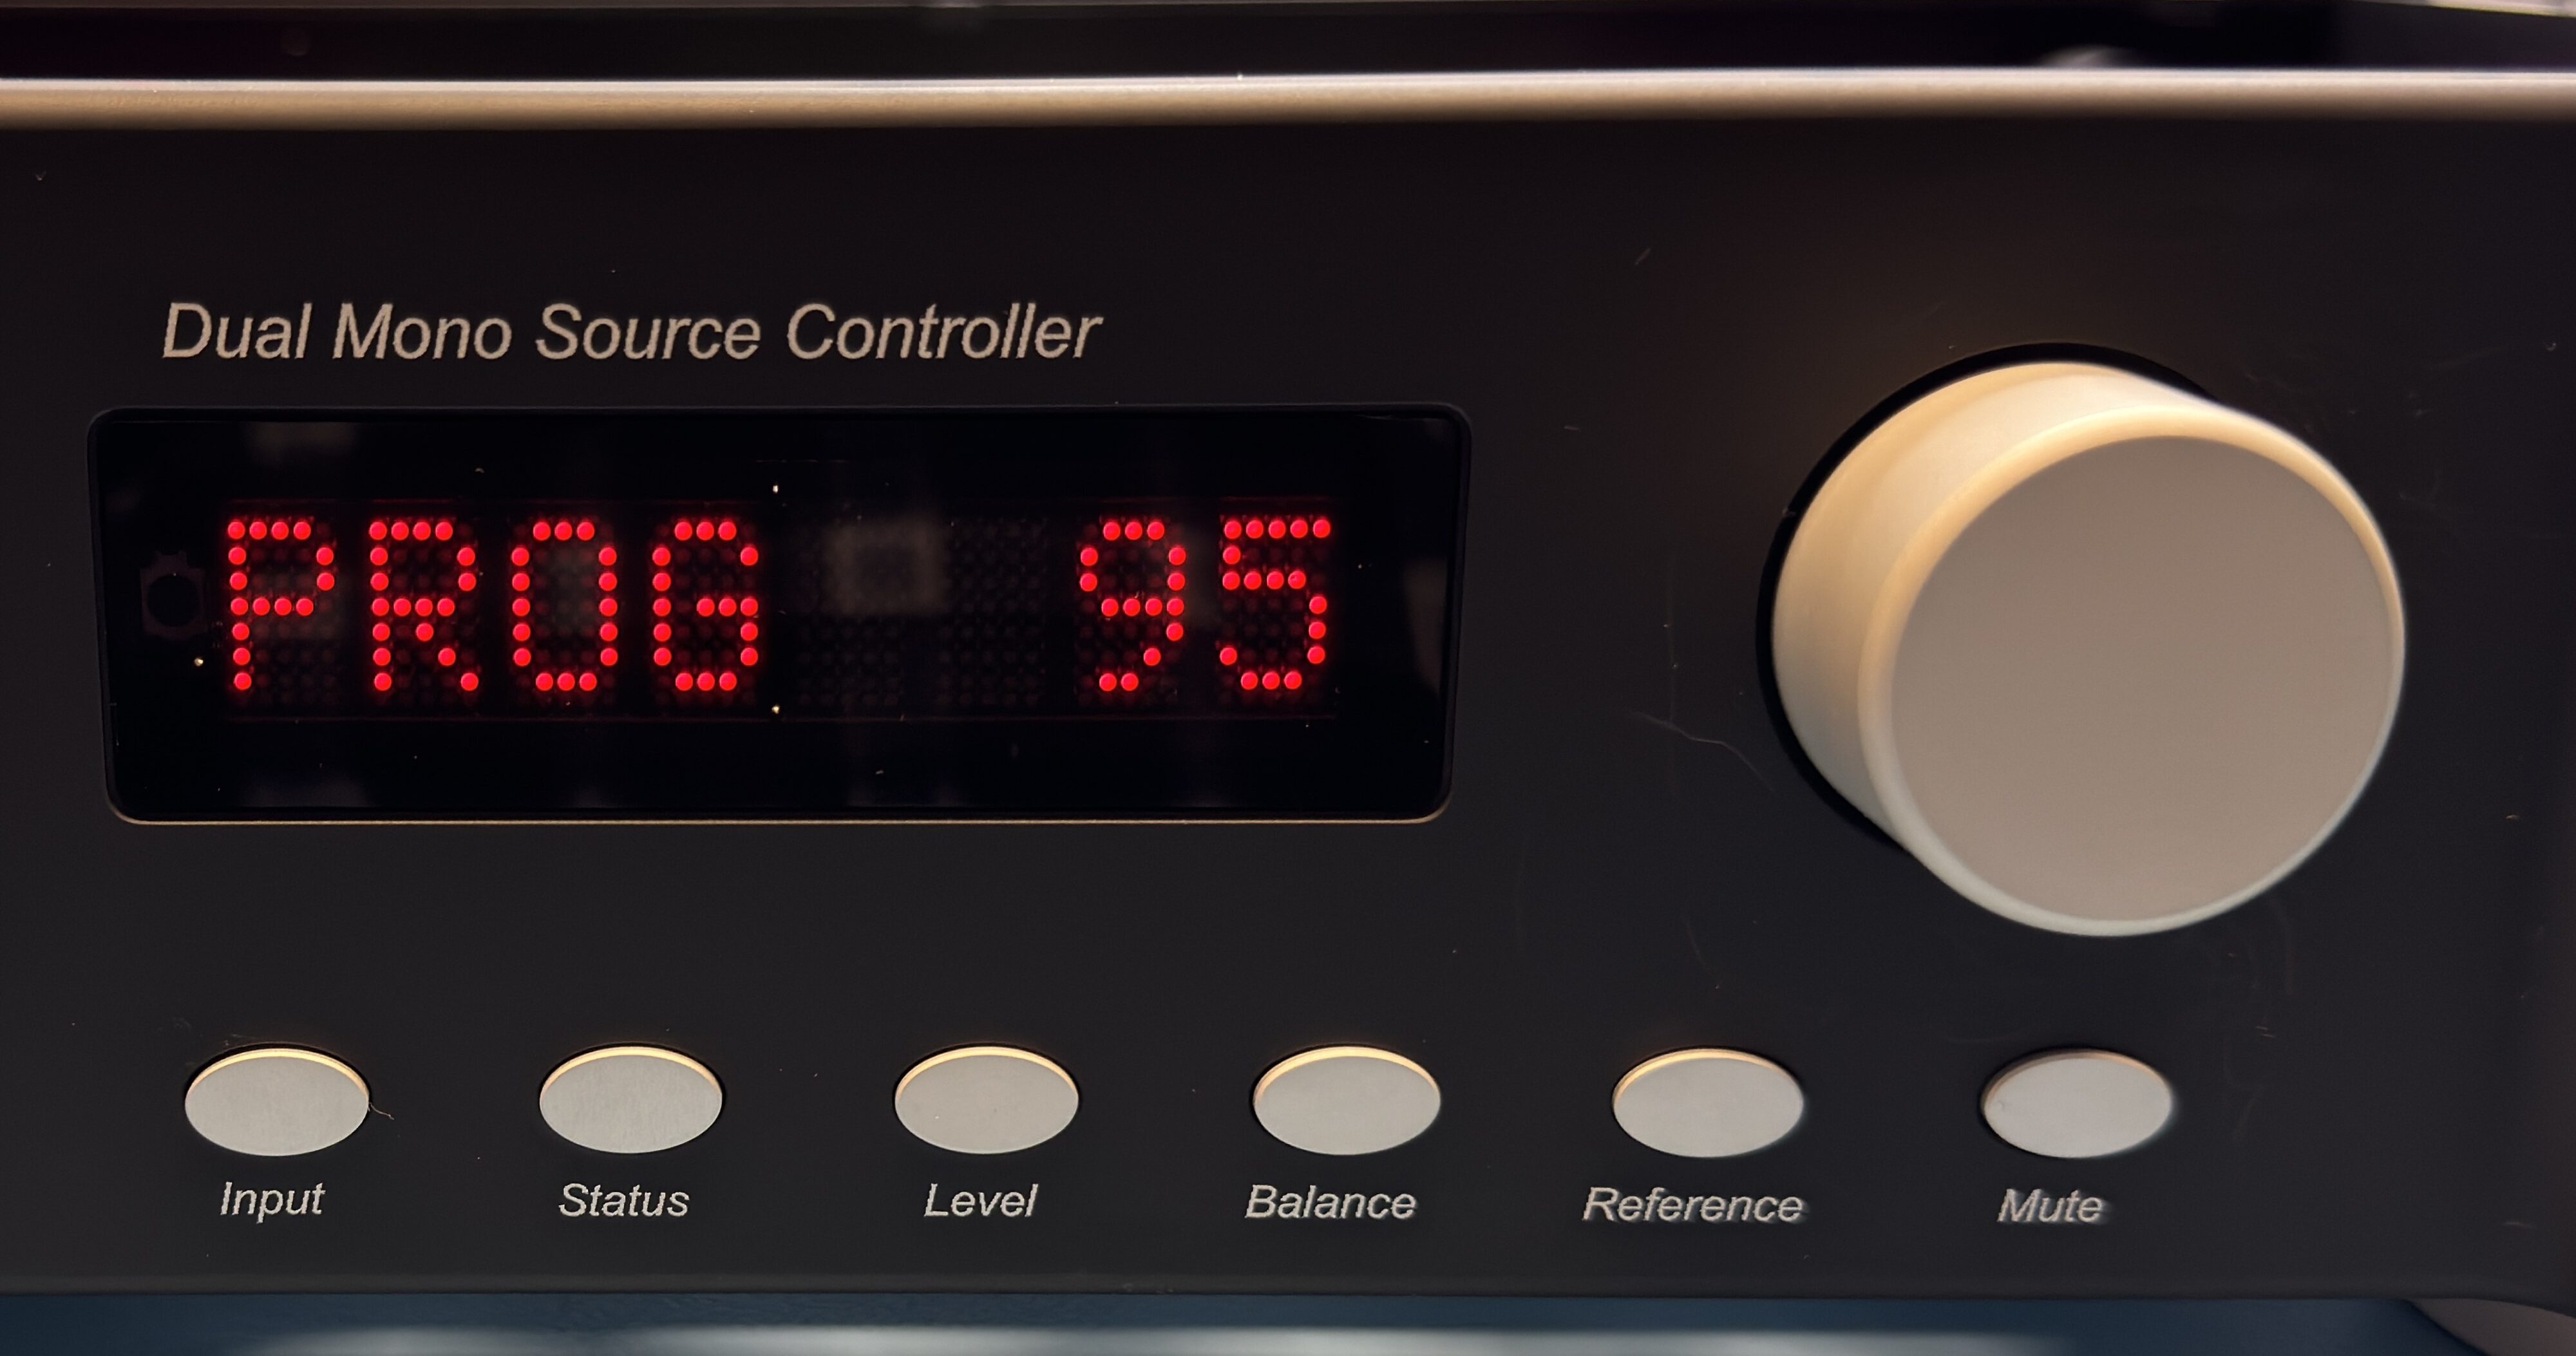
my new „used“ M12 was build in 2022, therefore has the MDx Board installed but it is still on the old red DOT Matrix display. I really like the new disülay and so I send an email to info@bricasti.com which was answered only hours later on a sunday early monring (us-time) by Brian. As I had contact with them before when I owned the original M1, I was used that I get speedy replies, but on the last day of the year beeing a Sunday? This is the extra mile they walk for their customer.
As with most things they are willing to offer an upgrade path. And here I was offered three different solutions:
- I can send the full unit from Germany to the factory in Massachussets and get it fully done by the factory including a unit test.
- Send just my front plate to the factory, get the modified assembly get out CNCd, the display unit fitted and the encoder exchanged.
- Just buy a new allready equiped M12 front plate.
As shipping costs and custom are high, I wanted to avoid shipping the device so I opted for option 3. I ordered it on a Thursday afternoon, and received the new front plate Monday morning next week.
The update process is as easy as dealing with Brian:
I used a ESD wrist strap but most probably that´s jus beeing over cautious.
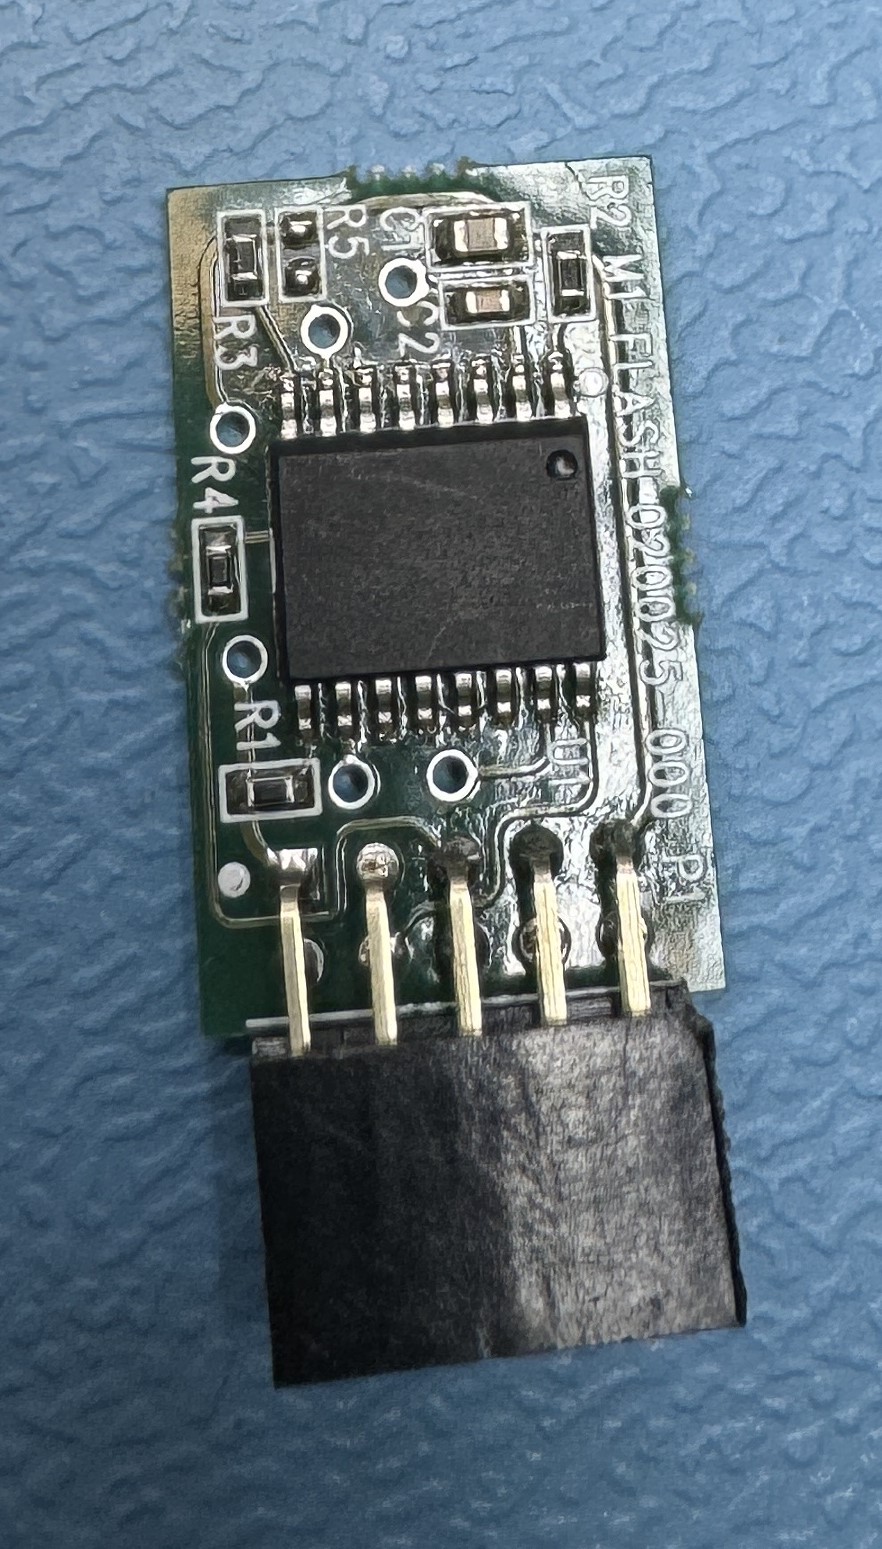
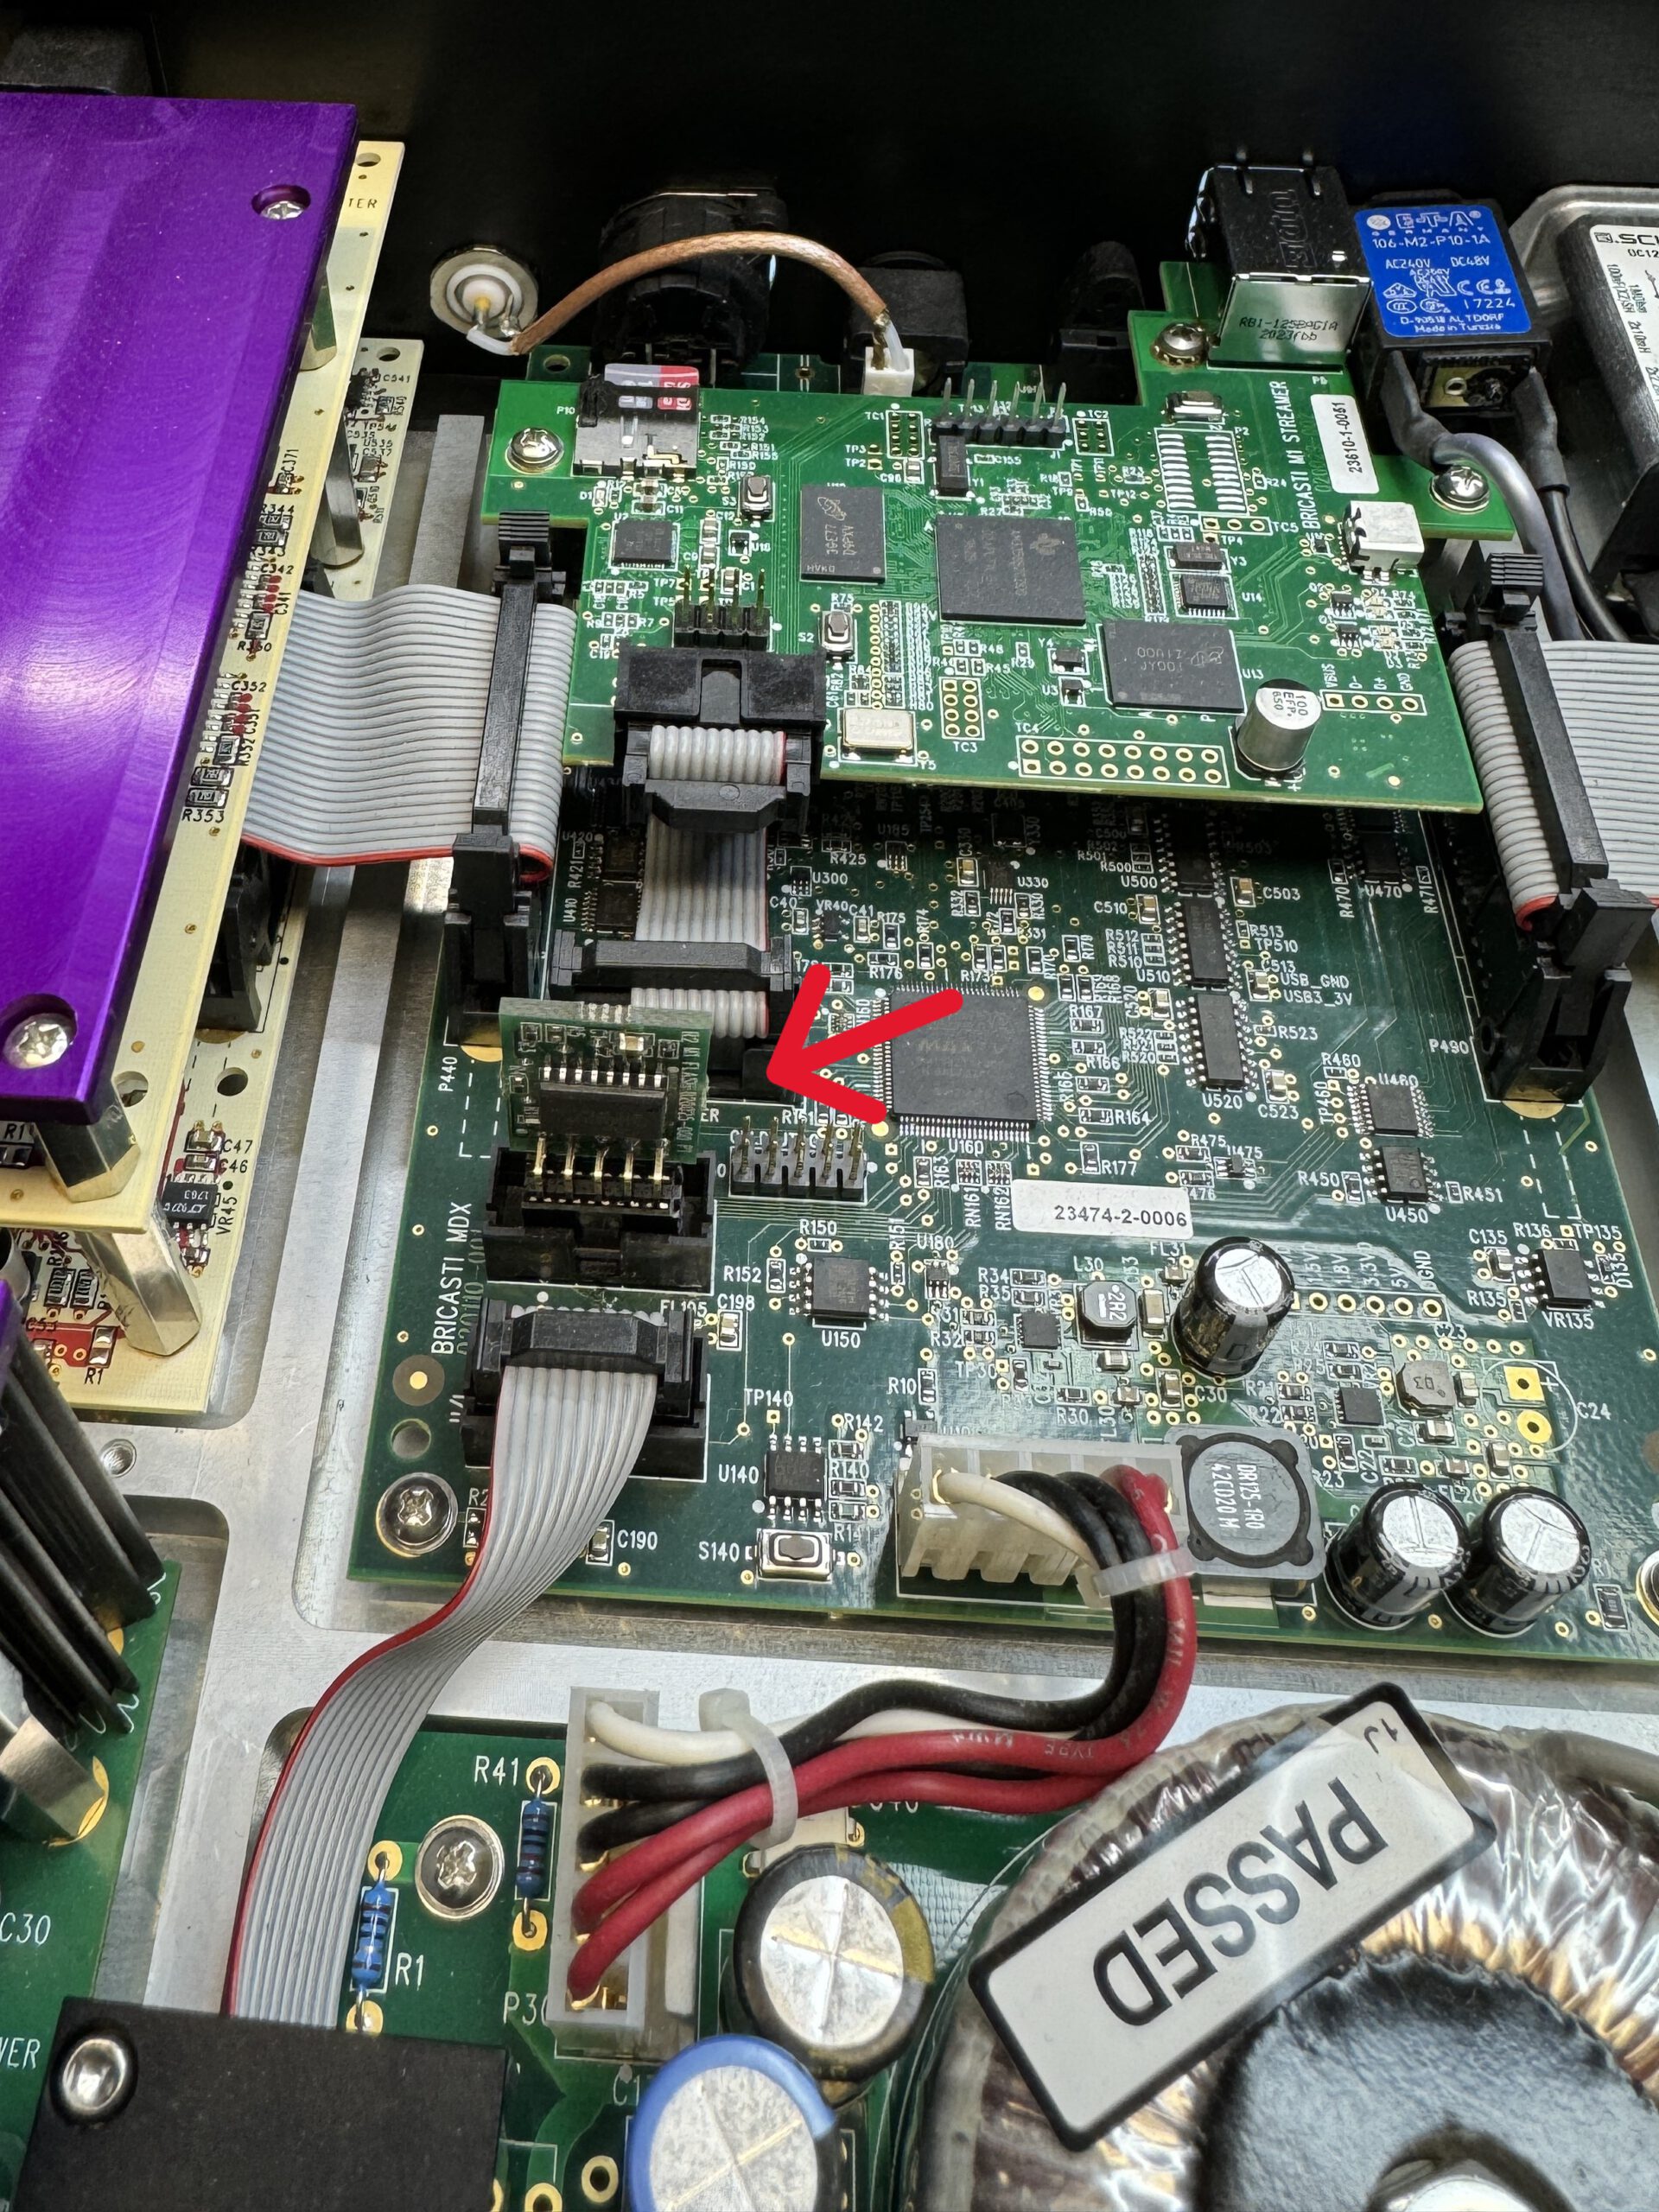
Next (without power), gently unplug the ribbon cable from the front panel assembly at the MDx board connector, unscrew the three screw on the bottom holding the front panel and remove the front panel completely.
Put the new Panel in place (comes with a slightly different connector, so use the new ribbon cable to connect to the MDx board:
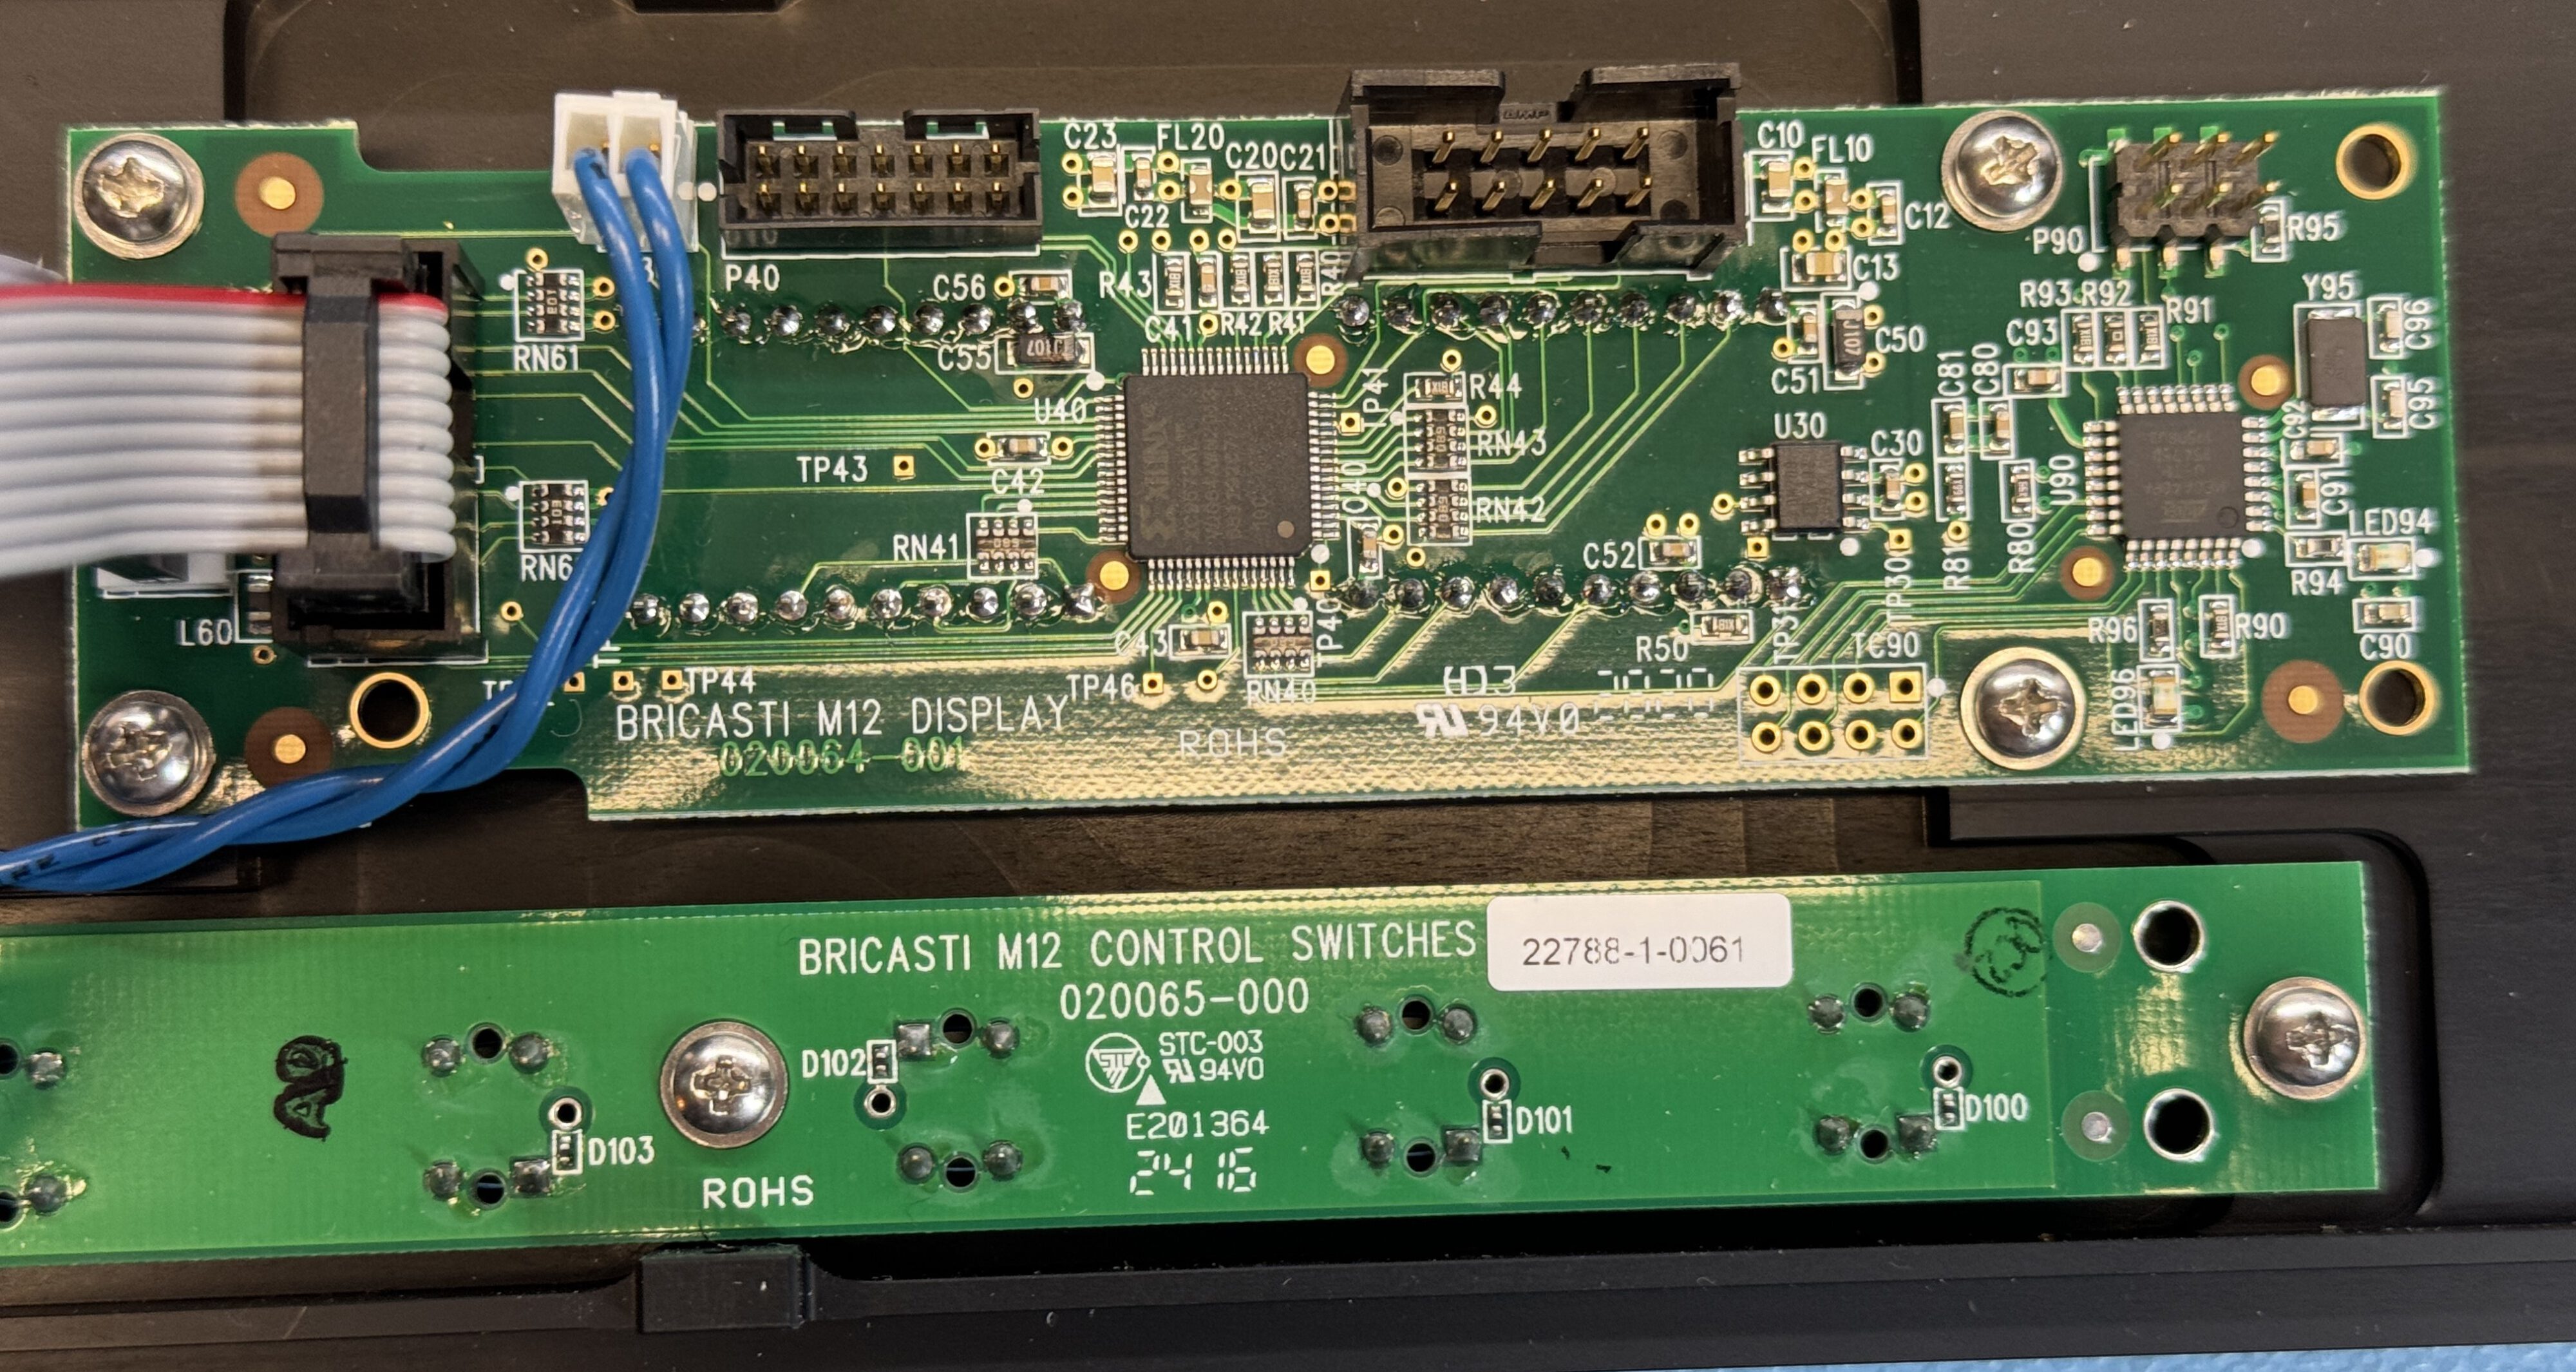
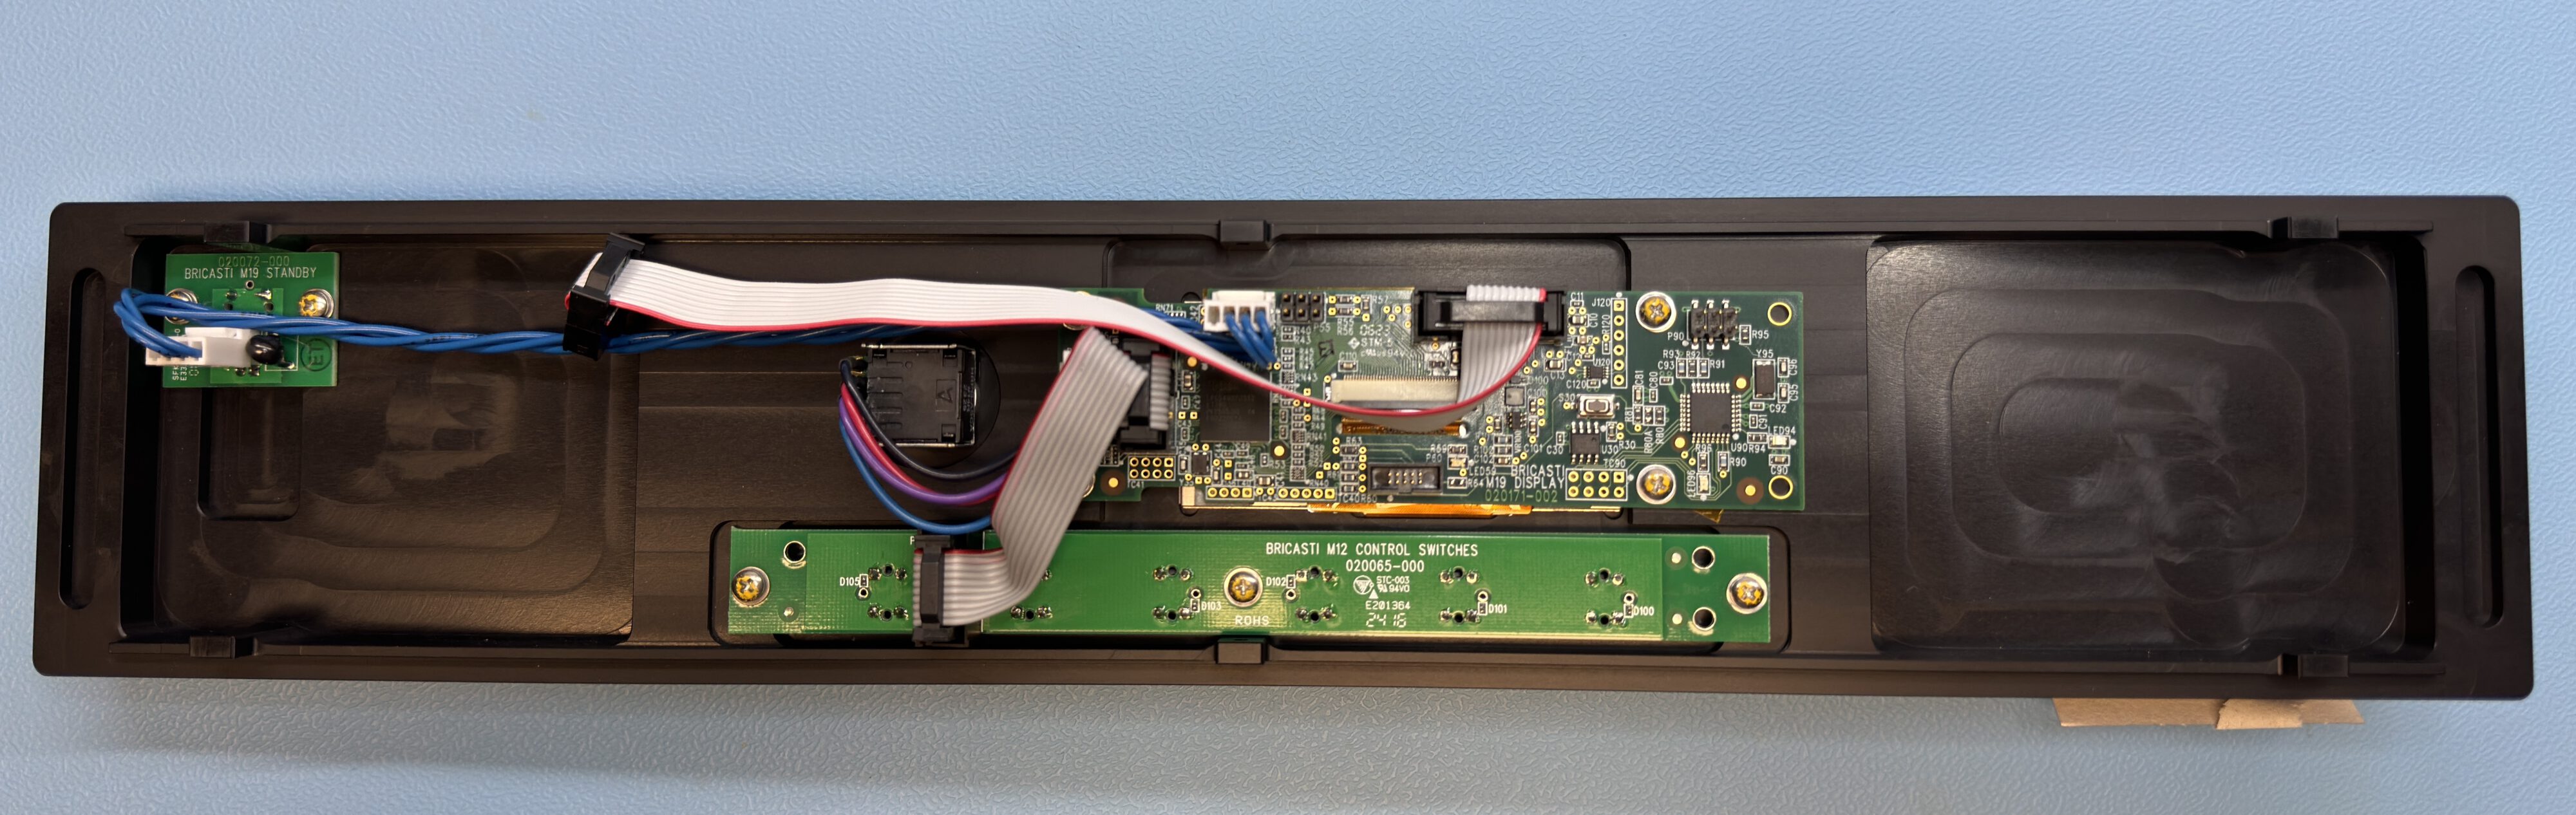
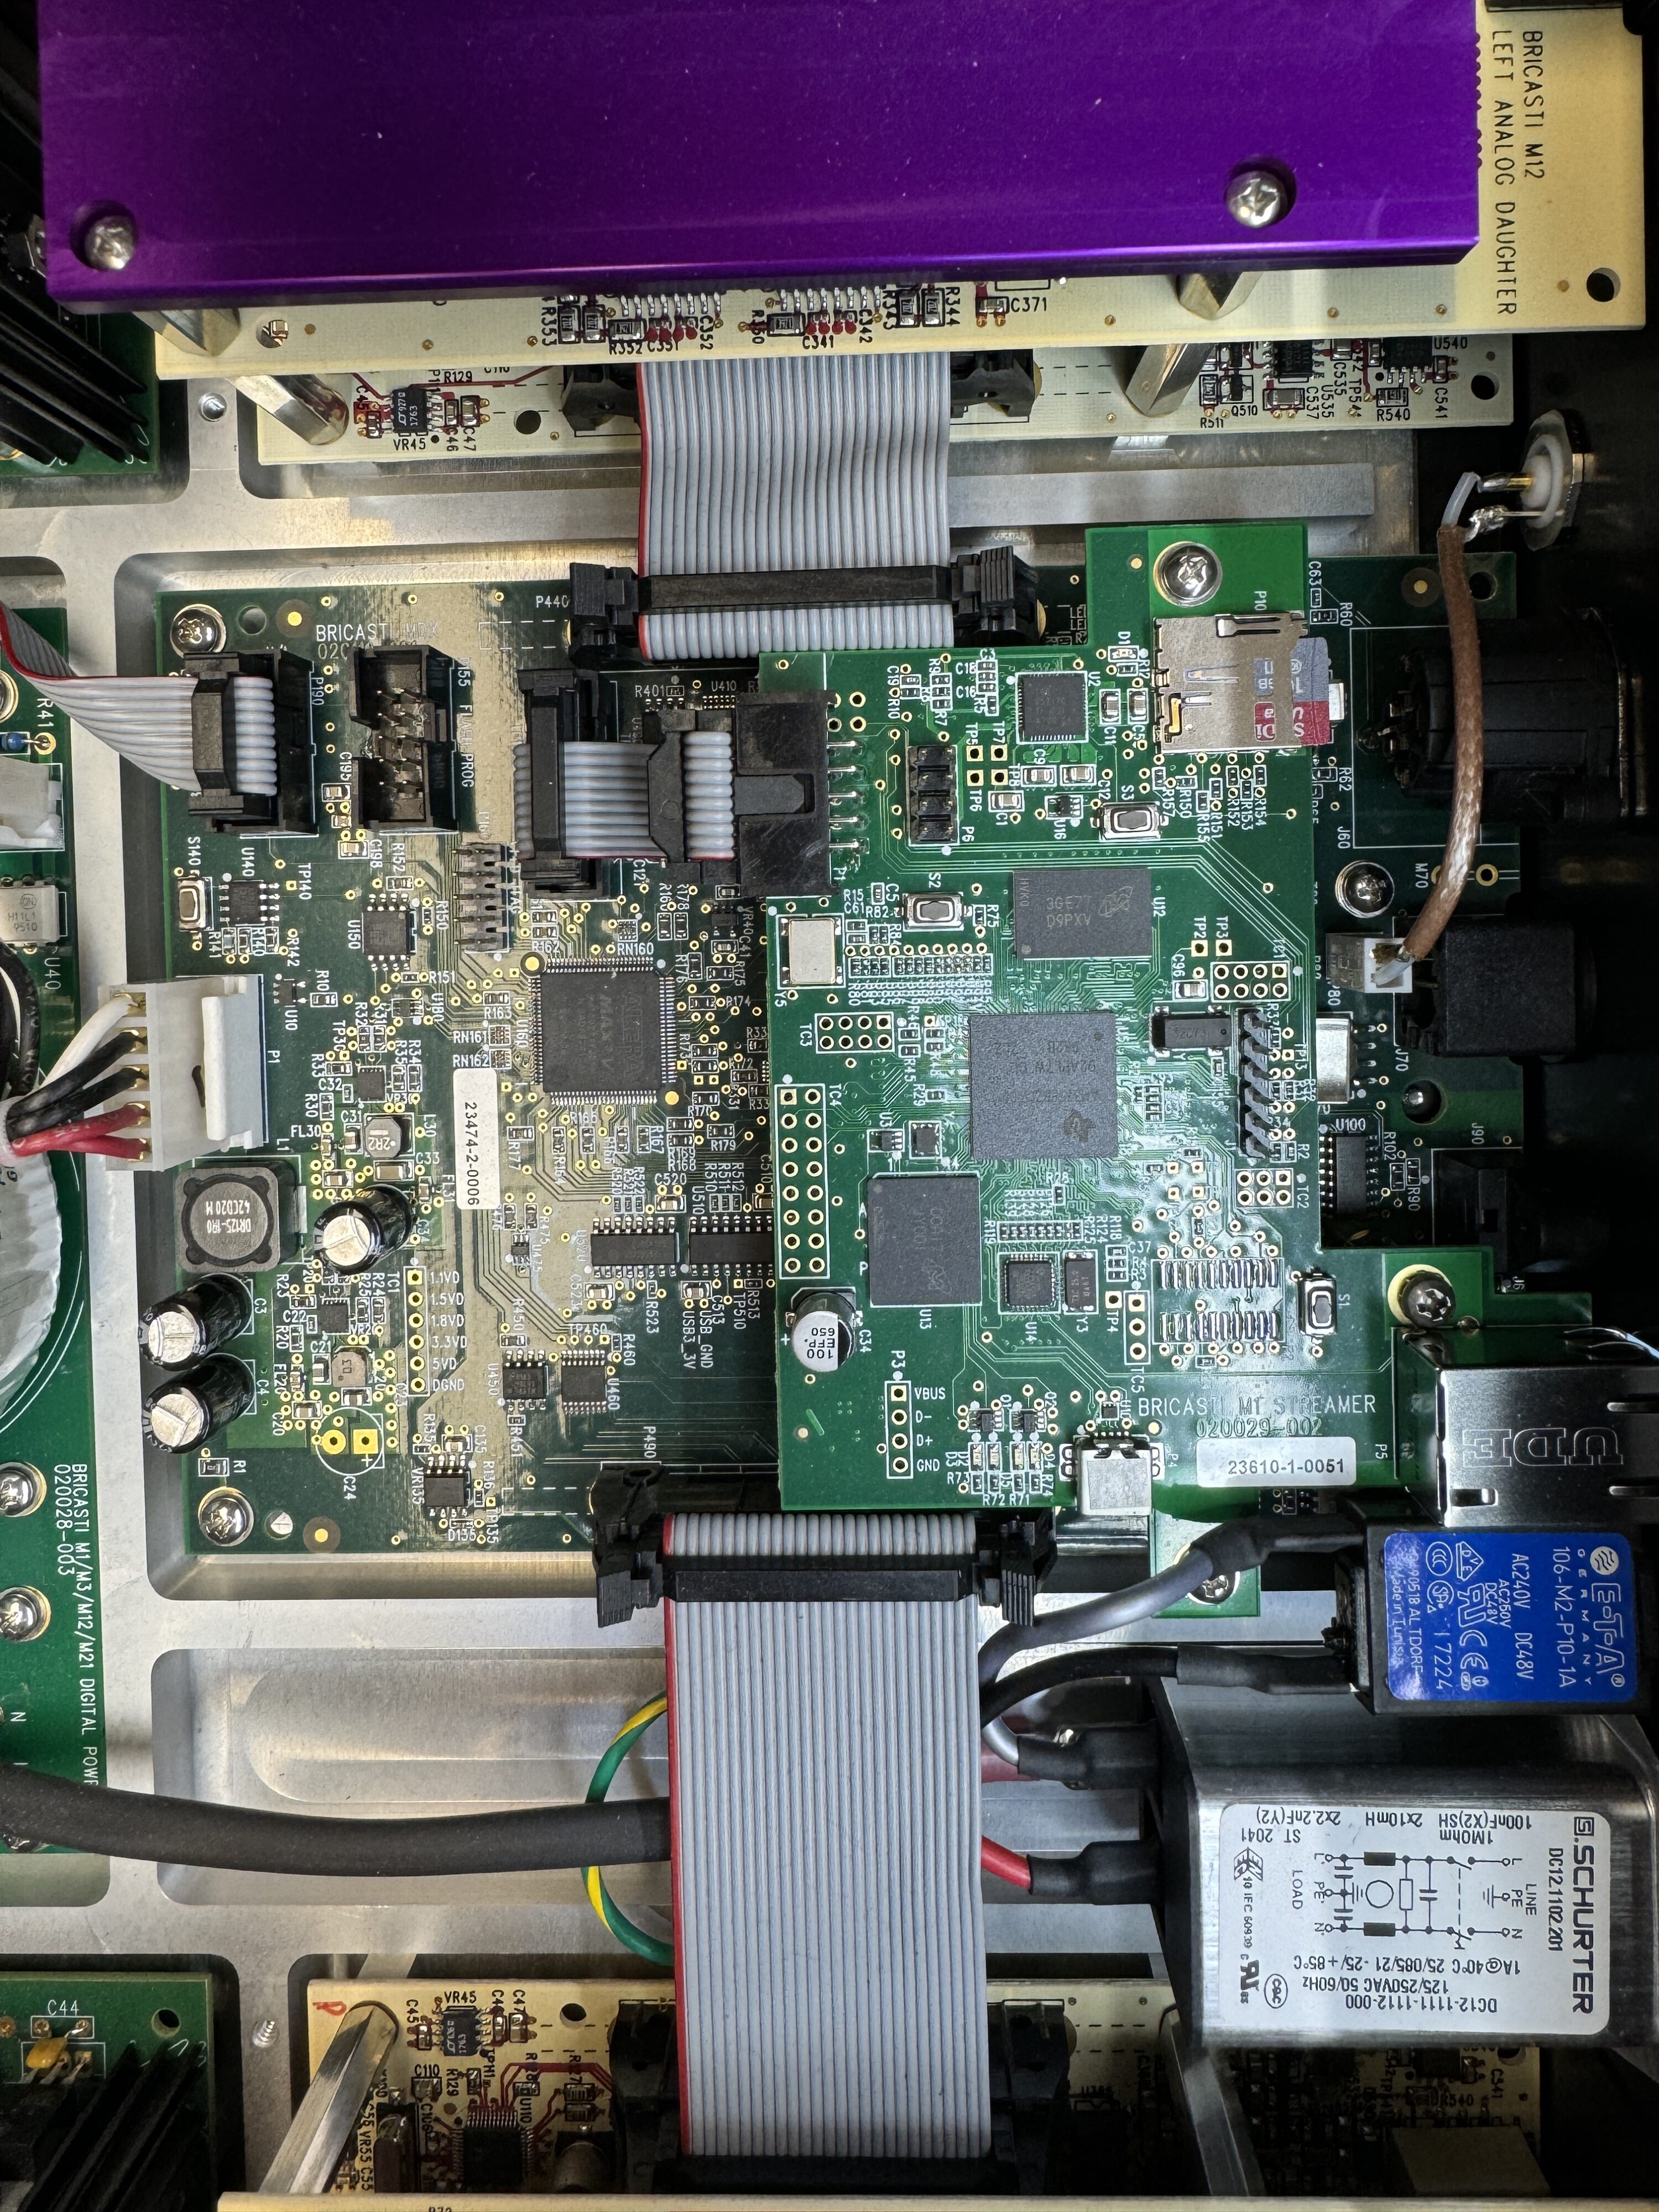
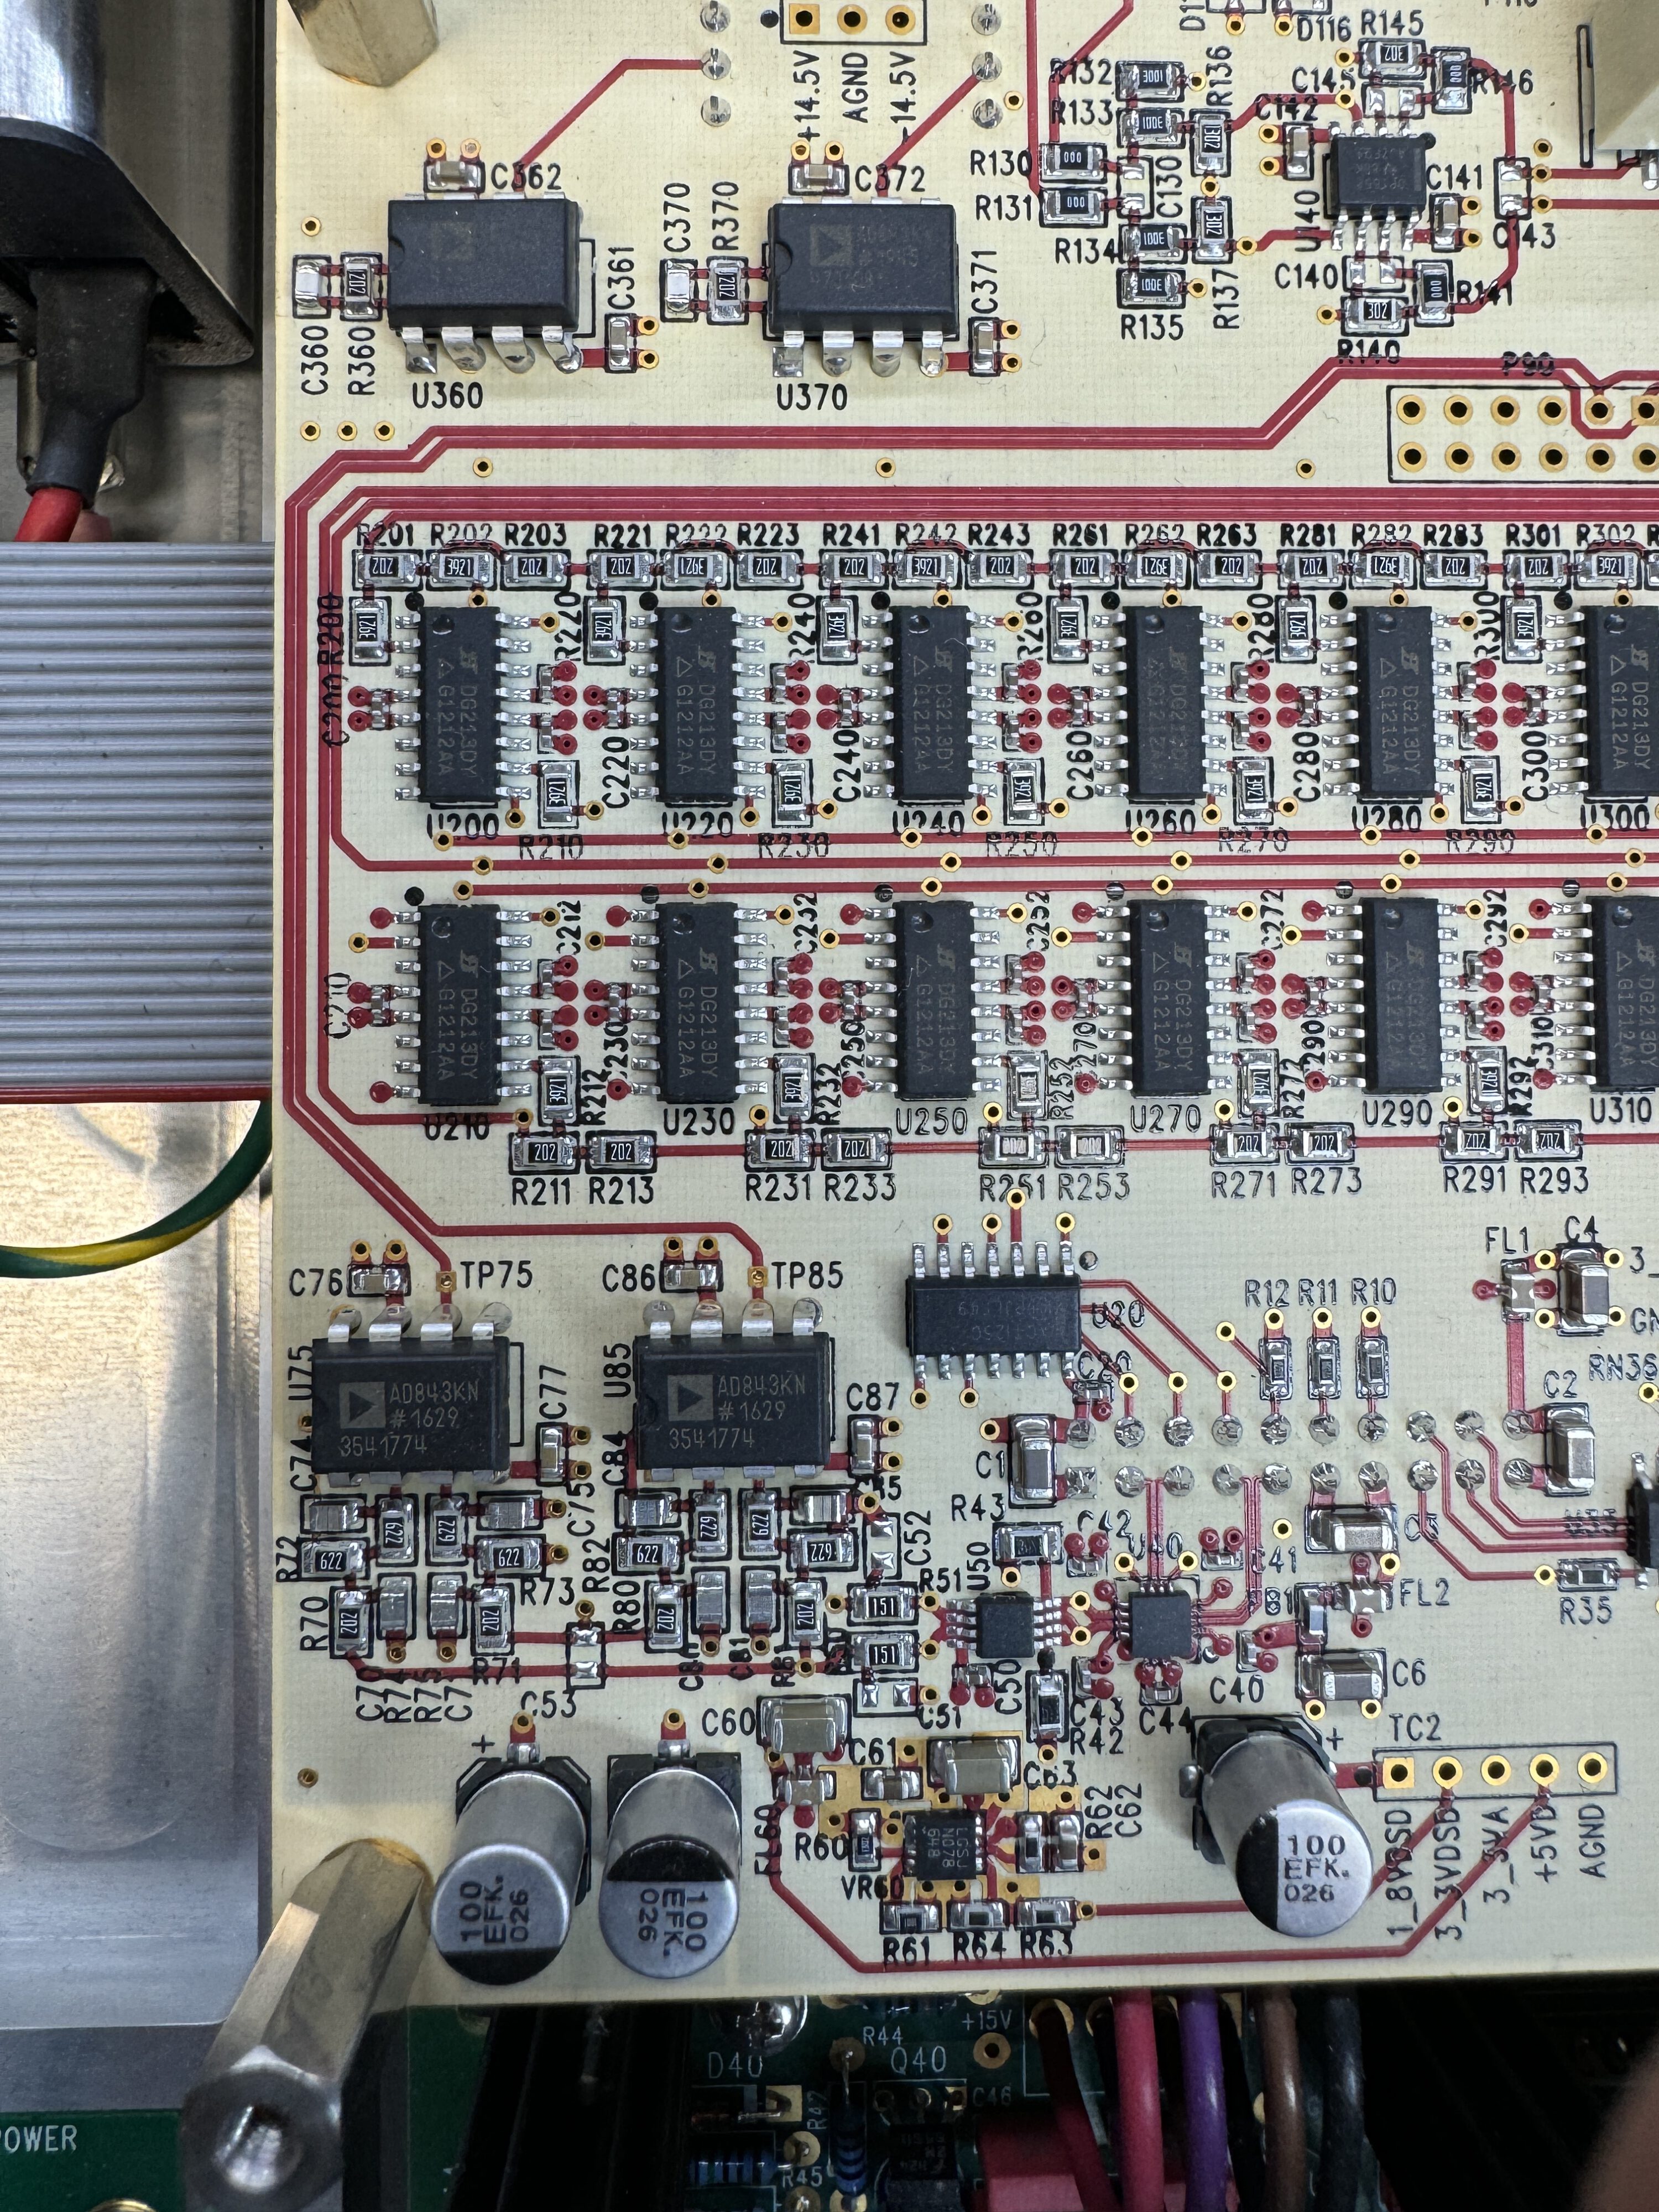
Some mor M12 porn shot during the exercise:


Friends, just my first impression.
Before I parted with my Bricasti M1 4 years ago, It was a long serving member of my main stereo. At that time working together with a Pass Lab X30 & X25 and a pair of Bryston B28SST2 it was a well balanced combination.
Life changes and the last 4 years I needed something smaller which could be moved more easily. So I decided to use a Devialet Expert 1000 pro as a good compromise on flexibility and performance. To make a long story short, I never really felt comfortable with this setup.
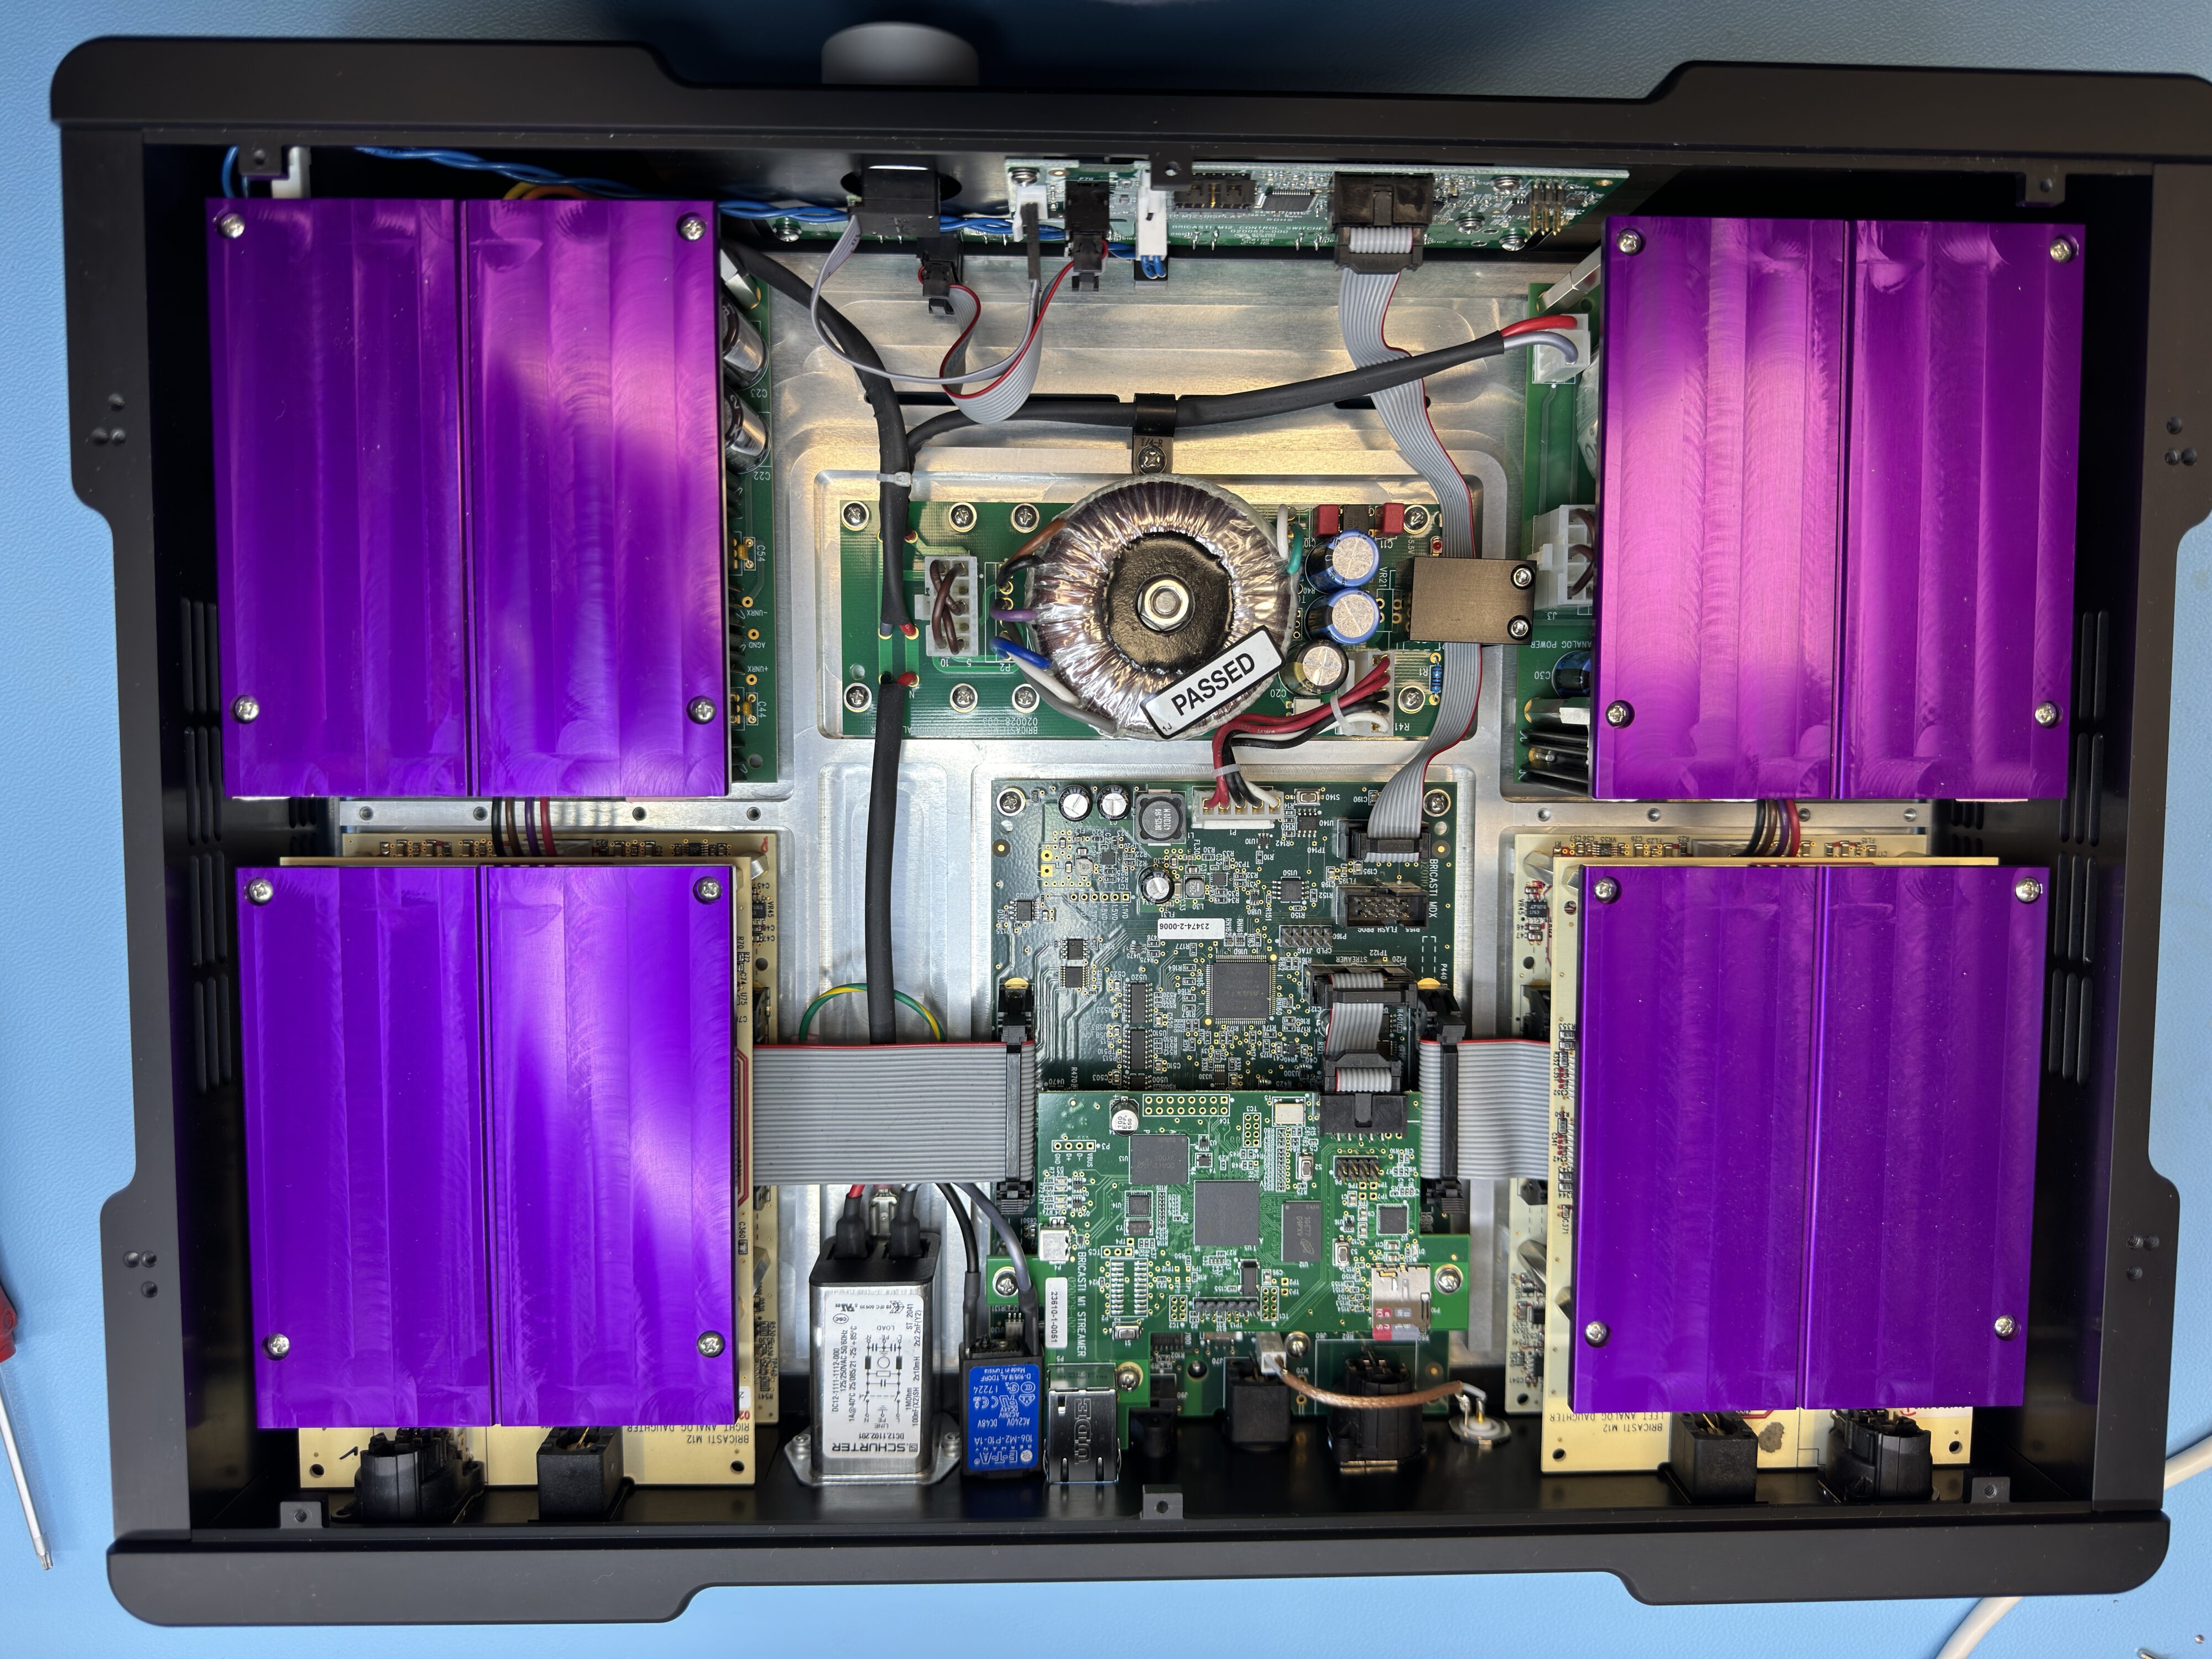
To start fresh in 2024, I bought a used Bricasti Design M12 MDx (2022) and a LAB12 Melto 2 for the phono part. The Bricasti is paired with some Hypex Nillai 500 mono amps and a Palthauf ESD to drive my Stax X9000.
The M12 serves is basically a DAC married with a basic preamp. Like all Bricasti home stereo equipment it is quoting the design language of a classical Mark Levinson series. Having enjoyed an ML380s for more than 10 years, this builds immediate trust. The build quality is outstanding, and you I wonder how much CNC machine time a single chassis takes to manufacture.
My initial listening session planned for 30 minutes took 3 hours. As always, I started with Arne Domnérus “jazz at the pawnshop” in the 30th anniversary remastered version. It is the Track 1 “Limehouse Blues” which is high on my test playlist but this time I stayed longer. The dialogue of the clarinet and the vibraphone was breathtaking. I rarely heard this so intimate and full of details.
Now Norah Jones came with “come away with me” to compare the PCM vs the DSD DAC department of the M12. So it was DSD64 vs 192/24. And to be honest, while I was convinced on the multibit section of the Bricasti, the DSD section did the final convincing. Norah being transparent on stage, hearing every single breath. This is quite a step forward from my former M1 and not comparable to the now retired Devialet.
Now it is time for classical music and some vinyl. For me Vikingur Ólafsson has delivered one of the best interpretations of the Johan Sebastian Bach’s Goldberg Variations. I could not stop before Variation 15. Proven the Bricasti does it´s preamp job fed via the XLR input without an issues. Maybe I was missing a bit Wayne Colburn´s exceptionally designed buffer in the Pass Labs X30 which sound a tiny bit more musical.
Barb Jungr singing Bob Dylan via a Ortofon Cadenza black proofed that the American /Greek /Danish /Japanese combination is harmonizing well. No surprises here and it sounds like it should.
The evening continued with more classical music from huge organs to large choirs. No flaws detected and everything felt balanced and right.
Conclusion
The M12 is a no nonsense masterpiece of engineering while keeping the virtues of a musical instrument. It is neutral as hell without sacrificing the ability to lose yourself in the music.
And finally, my wish list to Brian for an MK II Version:
- A remote with dedicated buttons for volume control an input control.
- Allow either to switch off the RCA and XLR output individually or to switch the trigger via the remote to allow more comfortable operations with an external headphone amplifier.
- Allow to disable unused inputs.
- Give us a second XLR input.
I keep you updated
I will take a couple of detailed pictures from the internals and will post some more listening experiences regarding the huge variety of offered filters. This will take some time. You will find the final report in my blog end of February.
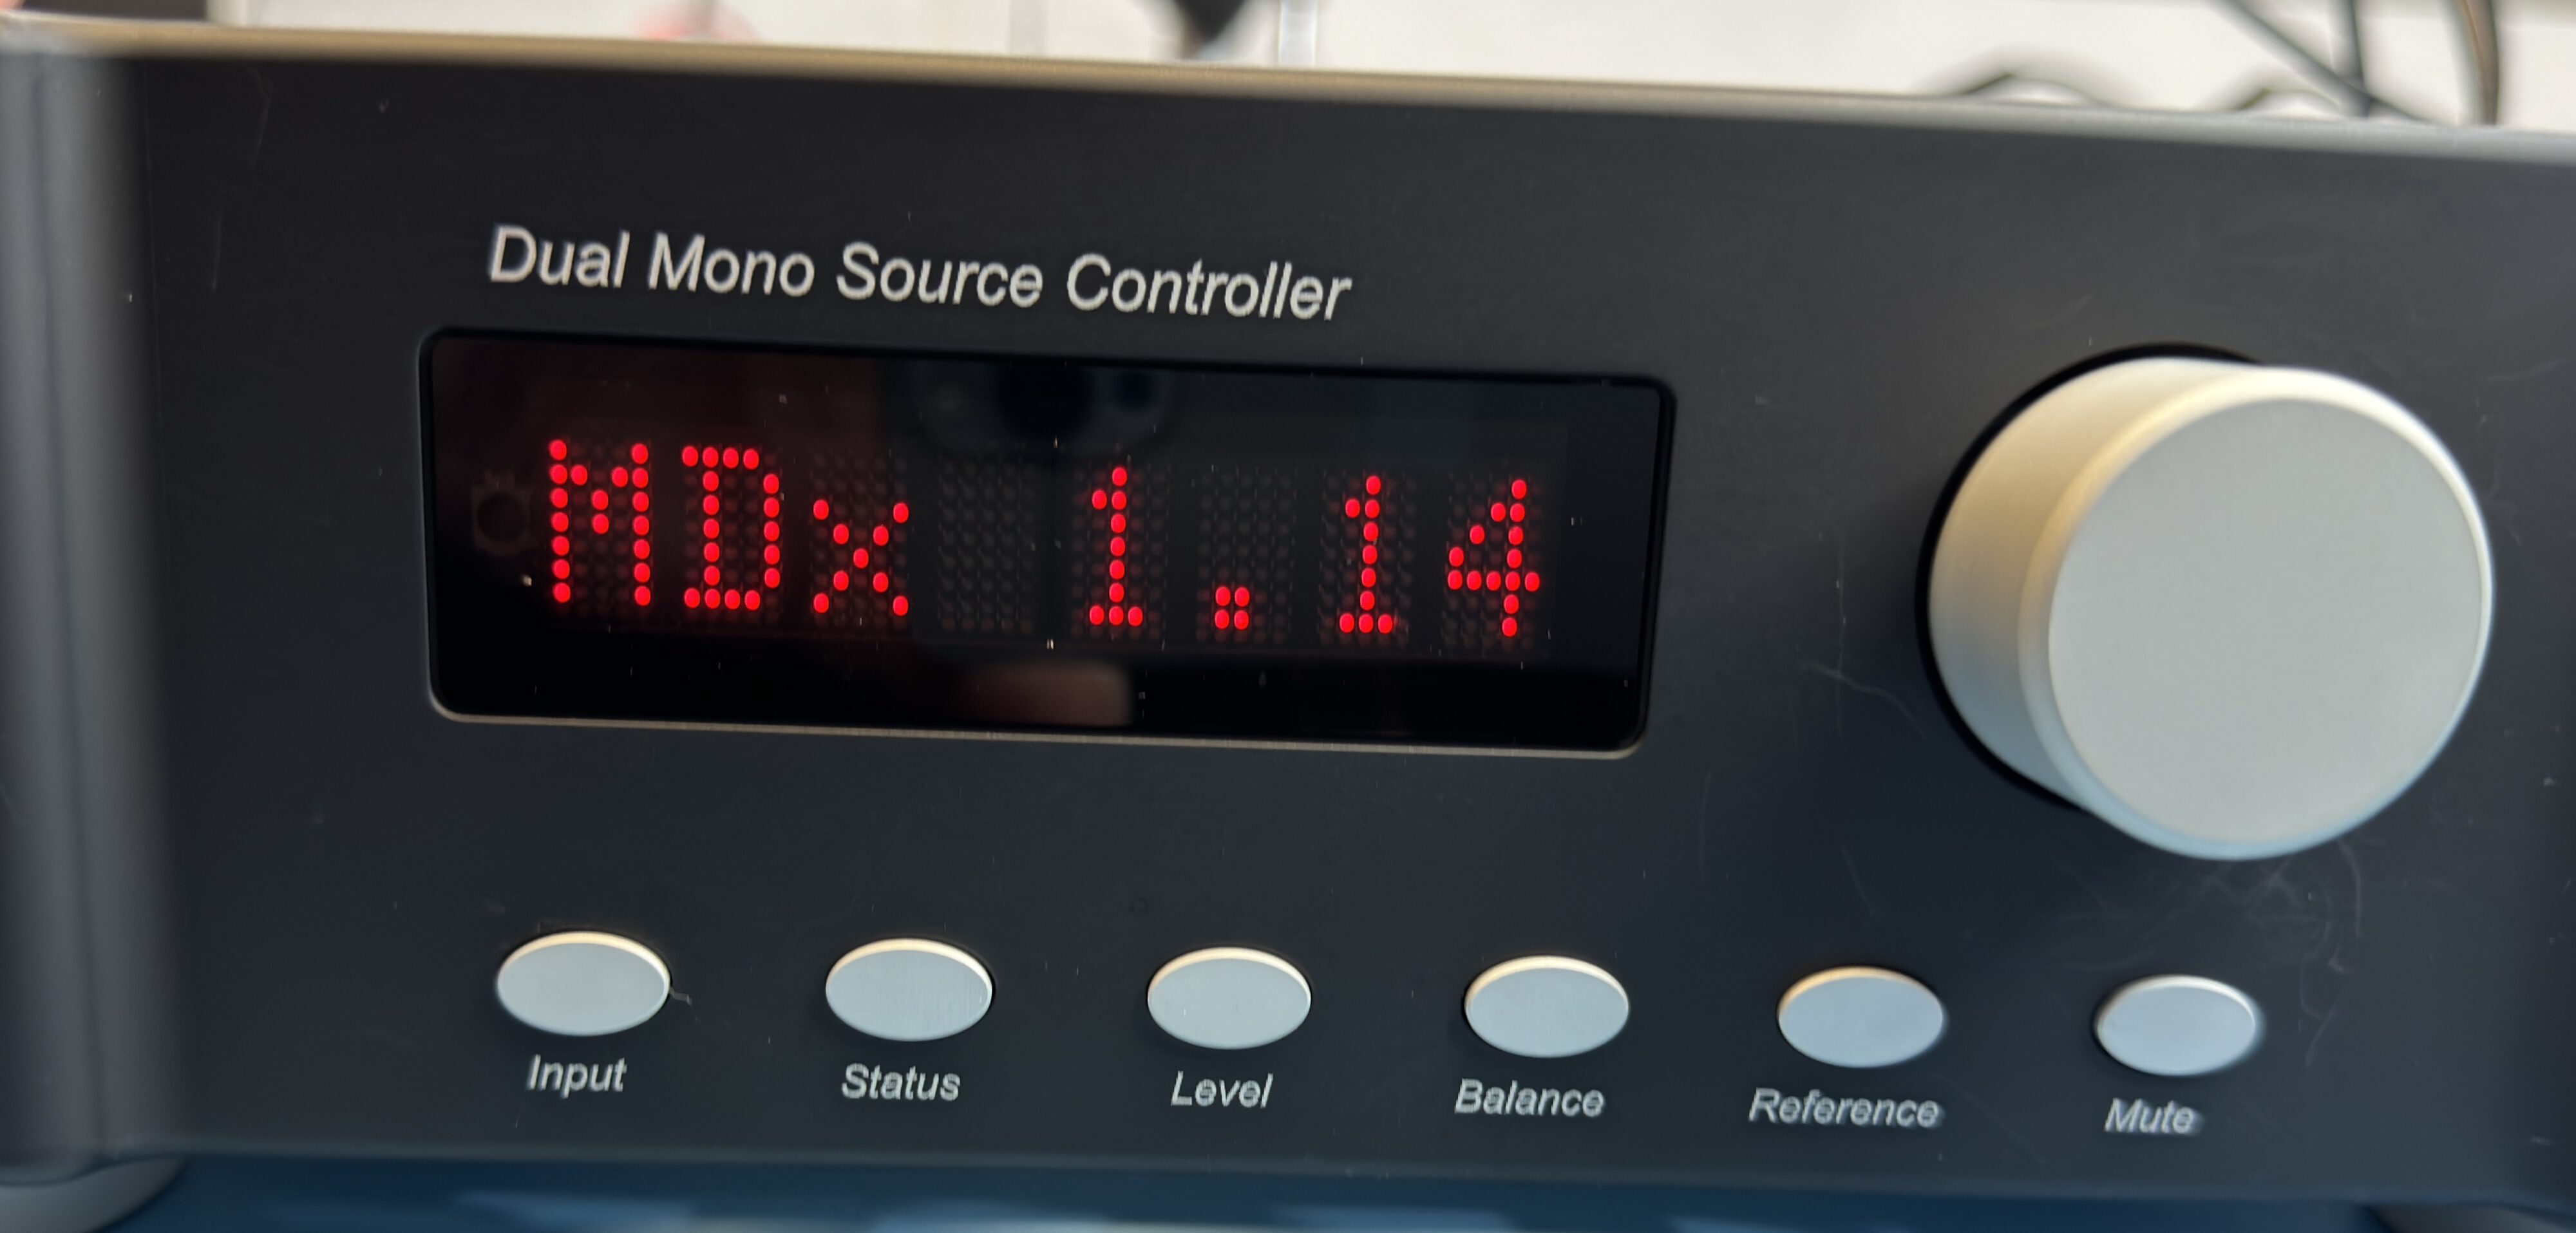
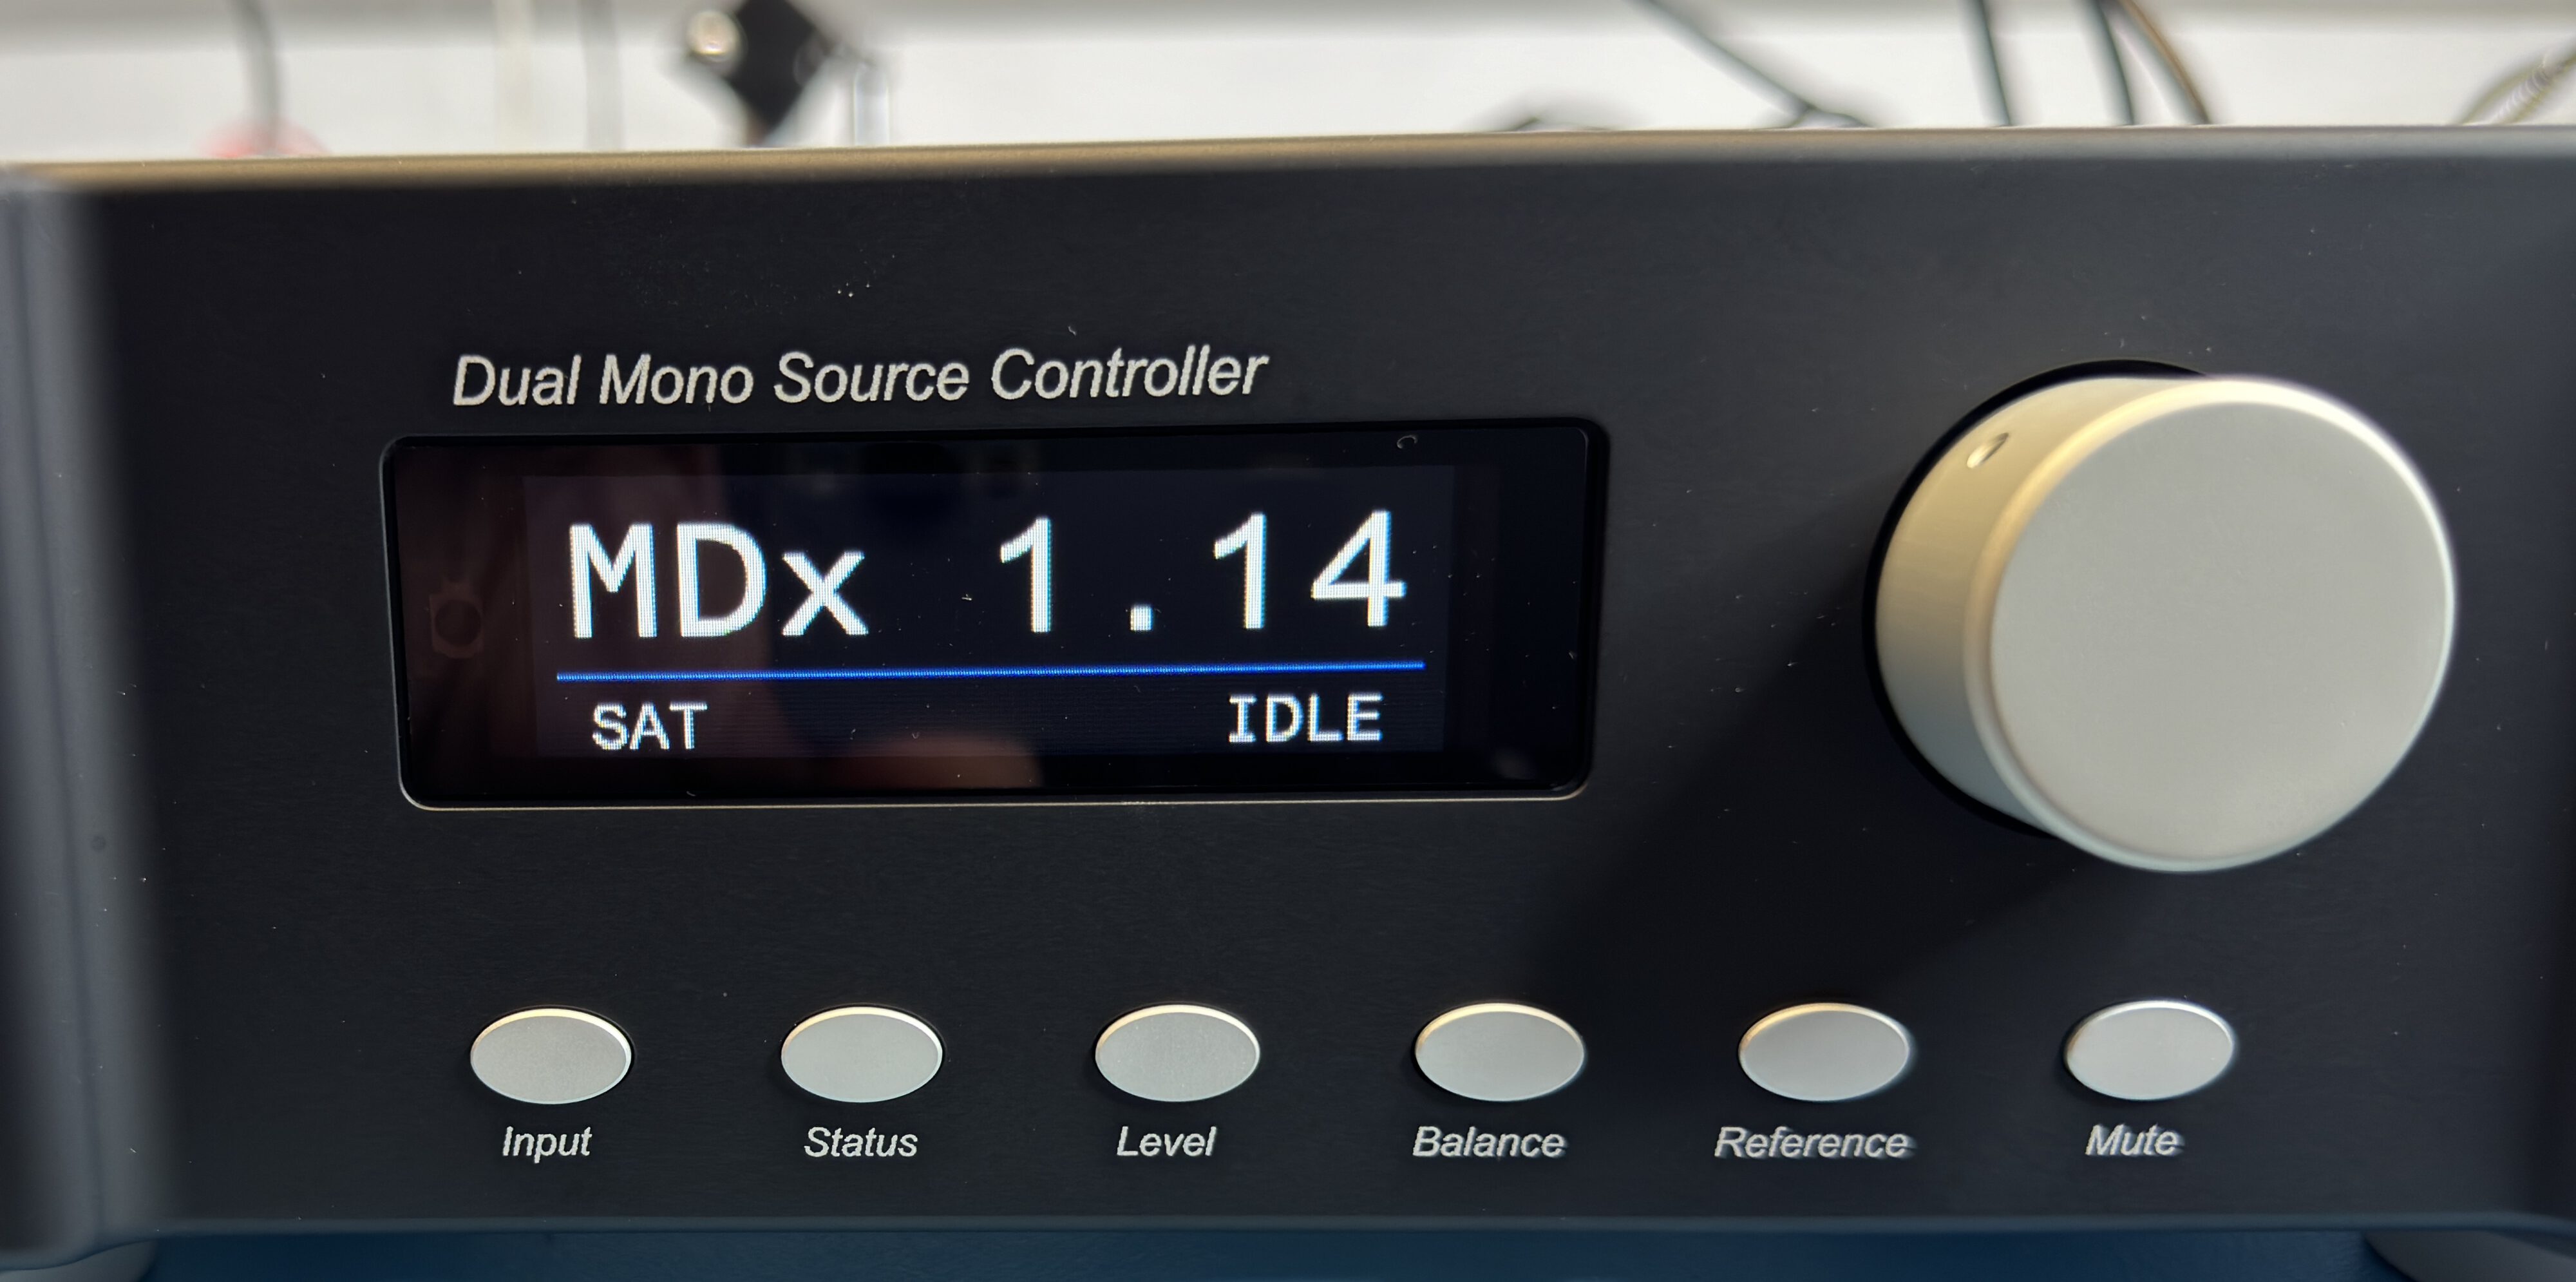
In addition I orderd an upgrade to the new graphical display with Bricasti in the US. It seems that they really care for their customer and are very responsive to their needs. With this will come an update to MDx Version 1.14.
Test Setup:
Preamp DAC: Bricasti Design M12 MDx V.1.10
Phono Preamp: LAB 12 Melto 2 – Telefunken (Ulm) ECC88
Turntable: Oracle Delphi V Anniversary, SME 345, Koetsu Black Gold Line
Denon DP 7000, SME 5009, Cadenza Black, SME M2.9 BENZ ACE S
Speaker: Magico V2
Headphone: STAX SR X9000
Headphone Amp: Paltauf ESD